
Integrations are a way to connect to and work with third party systems in vRA natively. Native integrations are easier to setup and use than non-native (vRealize Orchestrator workflows and actions), but they tend to lack some functionality. Here we will discuss them in some detail, so you know how and when to use them rather than resorting to vRealize Orchestrator workflow development for everything.
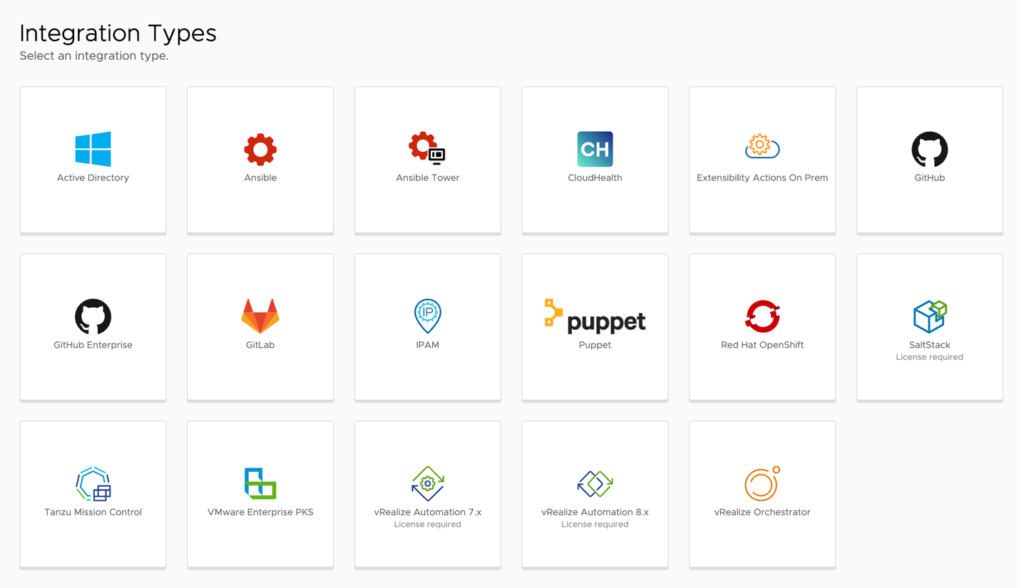
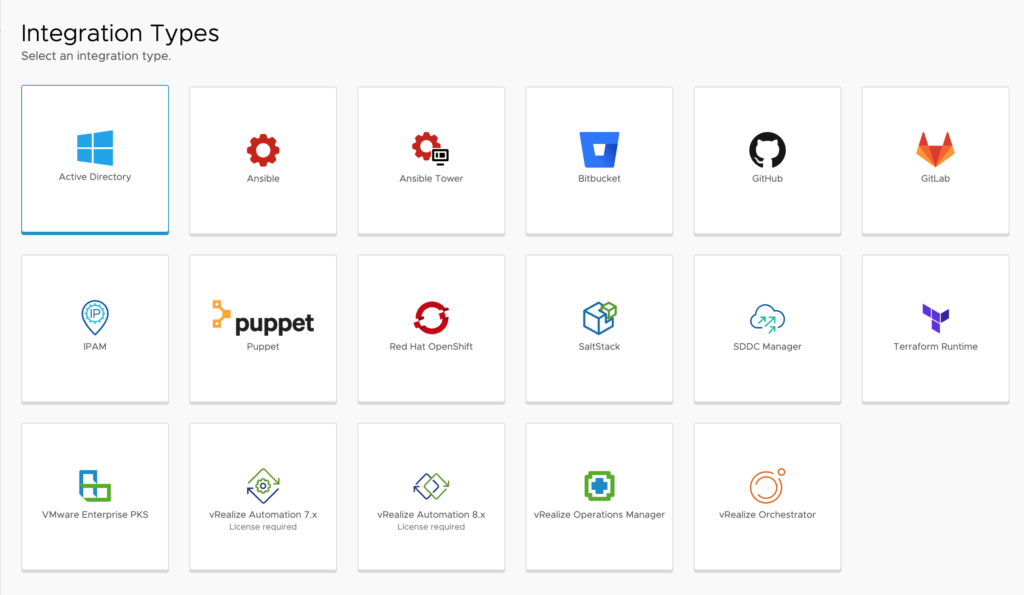
As you can see from the images above, there are some variations between VMware’s SaaS and On-Prem offerings.
Integration Types
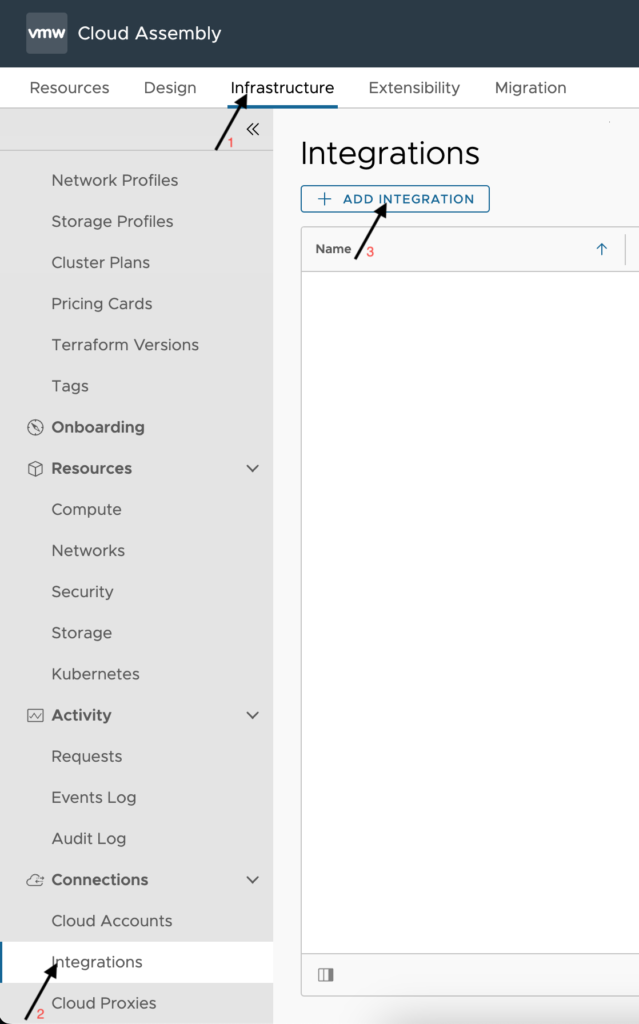
To select an Integration Type to configure per the below details, click on the ADD INTEGRATION button as shown in the below image.
Active Directory
Offering availability – SaaS and On-Prem
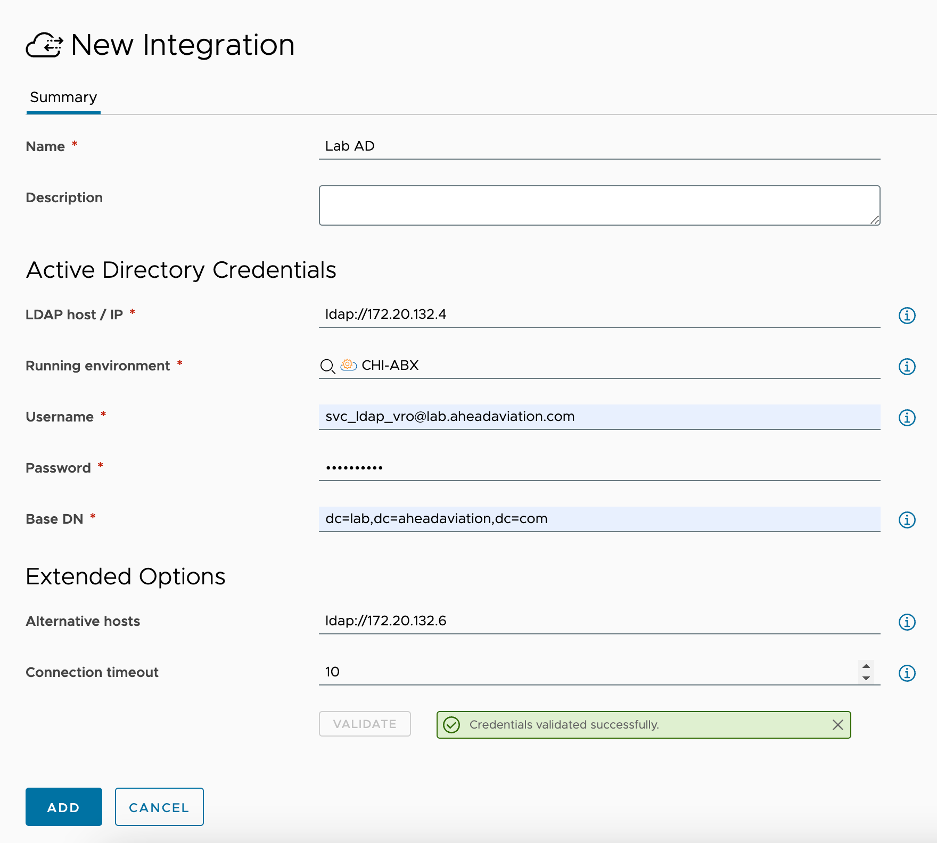
The Active Directory integration allows us the ability to create and delete computer accounts in an AD OU. We can create them in one OU, for instance a build OU, and move the account to a final destination OU at the end of the build process. Given this capability, we need to use an account that has permissions to create, move and delete computer accounts from any OU that we will be working with.
Configuration:
- Name – This is a friendly name to designate the active directory configuration.
- Description – <optional> supply additional details about this AD integration
- LDAP host / IP – supply the ldap URL for connection to the host. This can be a single AD server or a VIP name or IP address.
- Running environment – This is only needed from the SaaS offering as the On Prem offering utilizes the built in ‘embedded-ABX-onprem’. This is to allow us a means to execute the integrations ABX actions. It can be AWS or Azure cloud account, or Extensibility On Prem integration. For On-Prem and VMC on AWS environments, this would be the Extensibility Actions On Prem integration, so you will need to create that first as shown below in this article.
- Username – supply the username use to connect to AD. I tend to do this in UPN format (i.e username@domain.com) Remember, this account much have the needed permissions to add, move and delete computer accounts from all required OU’s.
- Password – supply the password for the above account
- Base DN – The base distinguished name is used to limit the scope that this integration will work in. Large AD environments will cause longer action runs when referencing the base of the domain as shown below. For faster lookups in larger AD environments it is recommended to set the base DN further down the AD tree while still encapsulating all the OU’s you want to work in. For example, ou=servers,ou=lab,dc=lab,dc=aheadaviation,dc=com
- Alternative hosts – If you specified a single domain controller in the LDAP host/IP line, you may want to add a similar entry here to allow for a failover node to work with providing HA capabilities to your AD integration. Multiple additional connections can be added by comma-separating them out here.
- Connection timeout – The time in seconds that we try to connect to the primary host and each alternate host before moving on to the next one. The default is 10 seconds, but if your environment is heavily used, you may want to increase this timeout value to something more appropriate.
- Validate button – You must click on validate and receive ‘Credentials validated successfully’ message before being able to save the integration
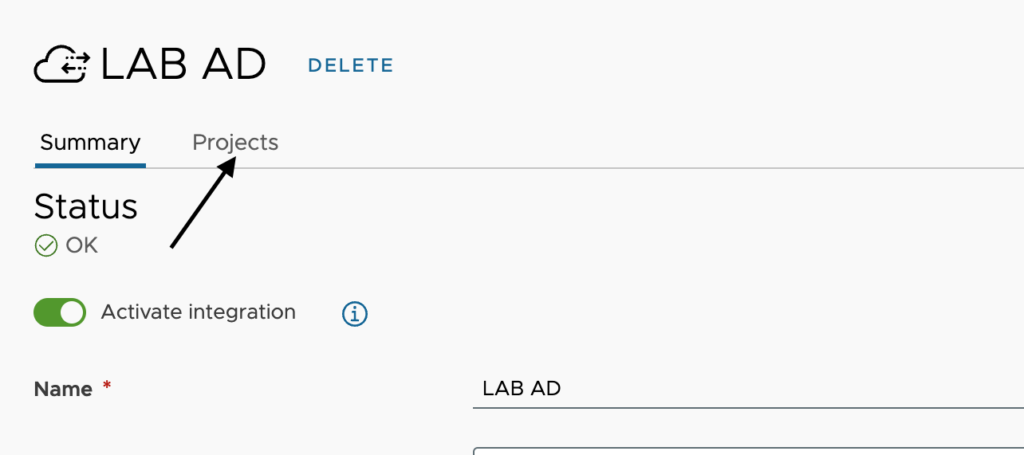
Now that the Active Directory integration is setup, we will need to apply more details per project. This is where we will configure the Relative DN for computer accounts as well as a few other parameters. Open the new Active Directory integration and click on Projects as shown here.
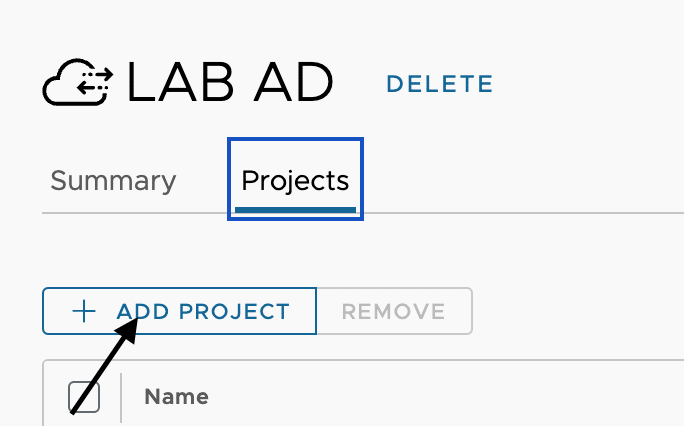
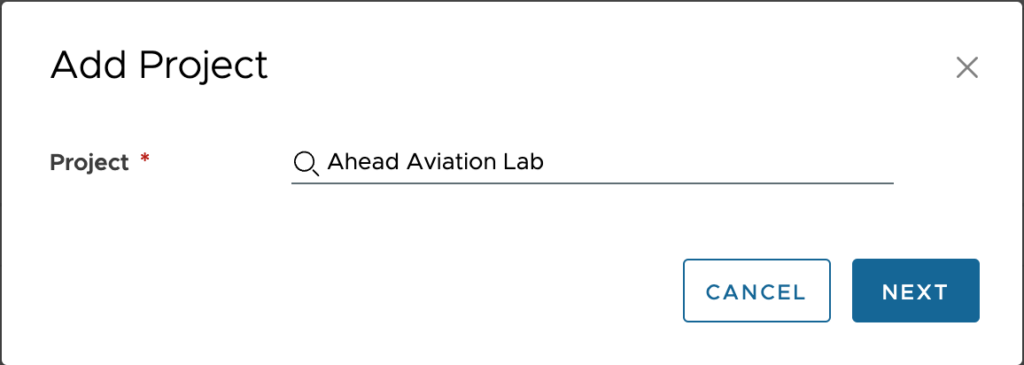
Now click on ADD PROJECT to setup the configuration for each project.
Configuration:
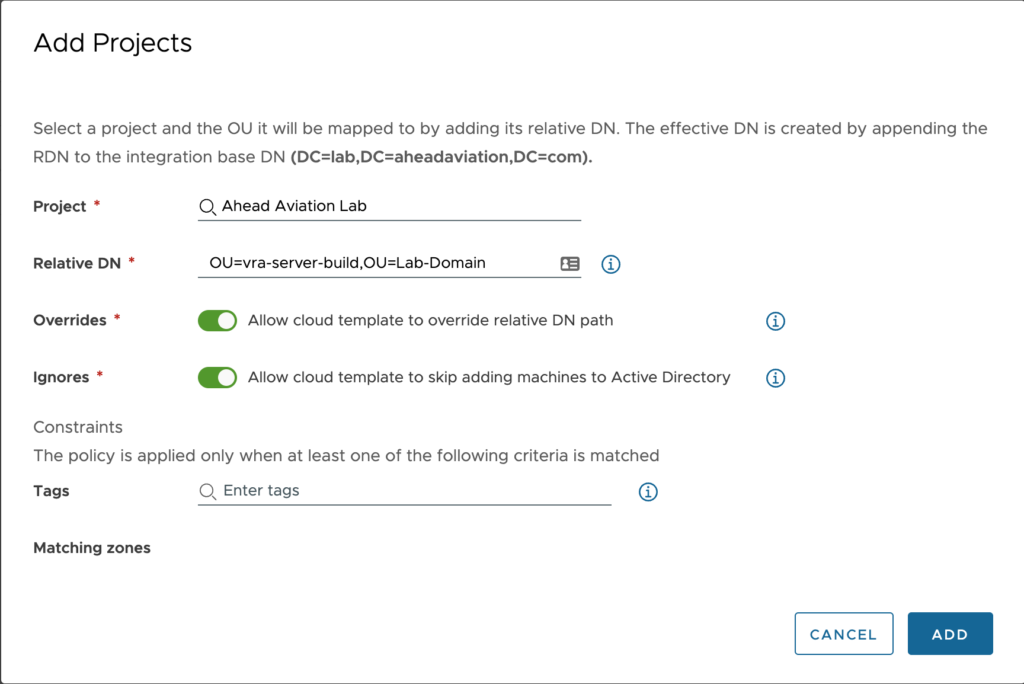
- Project – Select a Project from the search box. This requires that you have already setup one or more projects in vRA.
- Relative DN – Type in the Relative DN where a computer account is to be created. This would be the build OU if you are planning to move it to a final destination later or just the destination if you are not planning to move the account later in the process. As shown in the note at the top of the screen shot the effective DN is created by appending the Relative DN to the integrations Base DN.
- Overrides – Toggling this option allows you the ability to override the Relative DN within the Cloud Template. This can be useful if the relative DN pertains to a specific application or code revision environment.
- Ignores – Toggling this option allows you the ability to ignore using the integration all together from the Cloud Template. This is useful if you do not want to have a machine joined to the domain in the instance of Linus based machines.
- Tags – Set the tags that must be matched within the vRA environment for this integration to apply to. For instance, you have a Cloud Zone for a lab environment and this integration should only apply to machines deployed into that Cloud Zone. In this case you would place a constraint tag here that matches one from that Cloud Zone.
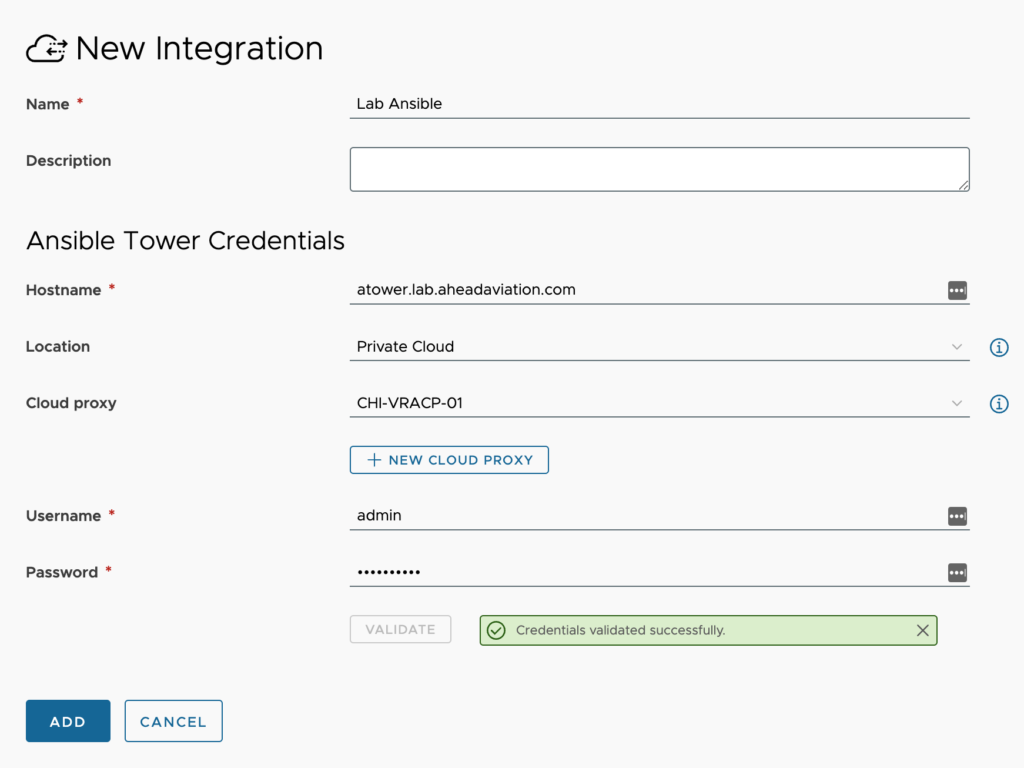
Ansible
Offering availability – SaaS and On-Prem
NOTE: This integration is not functional if you are using vRA to manage only Public Clouds and your Ansible Tower is not publicly accessible. This is because a cloud proxy would be needed to access Ansible Tower from within your network, but a Cloud Proxy can only be deployed in a vSphere environment (VMC on AWS or On-Prem vSphere)
Configuration:
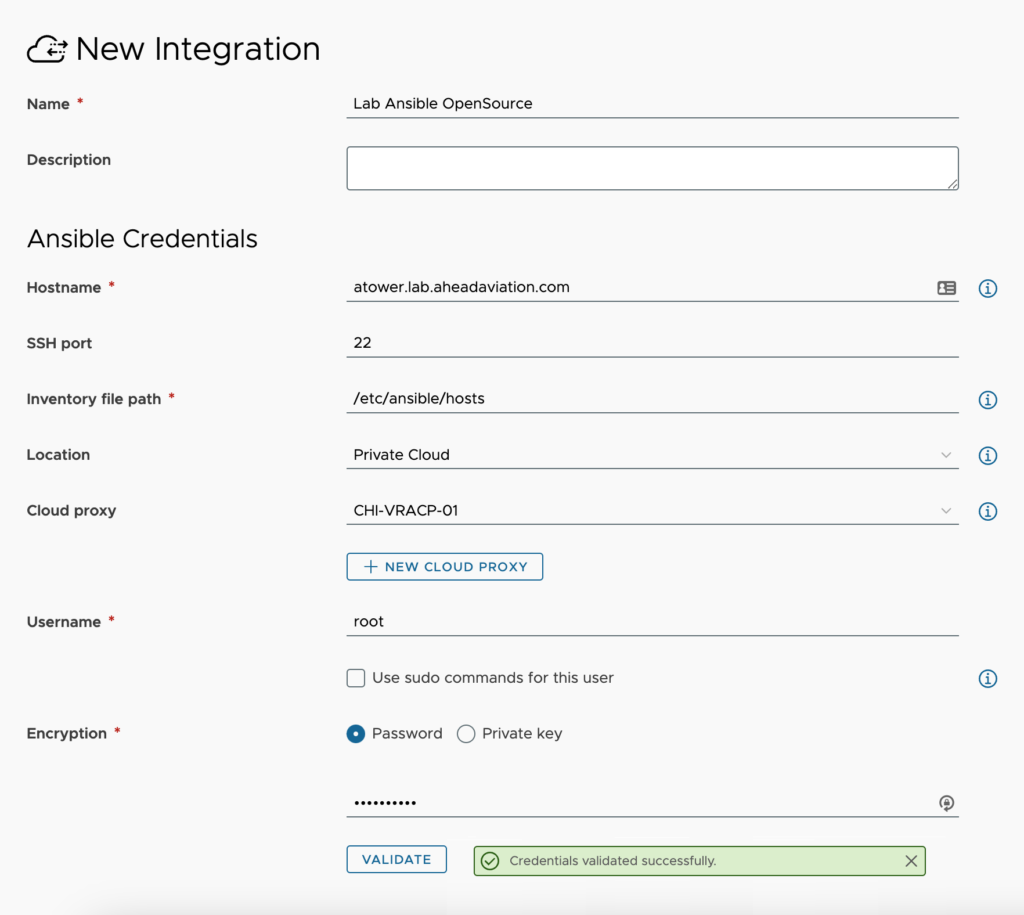
- Name – This is a friendly name to designate the Ansible configuration.
- Description – <optional> Supply additional details about this Ansible integration
- Hostname – Enter the FQDN of the Ansible server
- SSH port – Enter the port used for SSH access to the Ansible server
- Inventory file path – The default path of /etc/ansible/hosts is entered for you, but you can change this if you have set this up to another location.
- Location – Not a field within the On-Prem offering. Select ‘Private Cloud’ if you require a Cloud Proxy to access your Ansible Tower environment even if it resides in AWS, Azure, GCP or other cloud. Select Public Cloud if your Ansible Tower environment is accessible via a public IP. This is not a stated best practice from Ansible.
- Cloud proxy – Only visible when selecting Private Cloud from the SaaS offering. This requires that you have setup the needed cloud proxy. See the article about Cloud Proxies for details on deploying one.
- Username – Enter the username with appropriate permissions in Ansible Tower
- Use sudo commands for this user – Check this box if the account you are specifying requires sudo to execute commands.
- Encryption – Select ‘Password’ to enter the password for the Username or select ‘Private key’ to supply an SSH key to connect with
- Validate button – You must click on validate and receive ‘Credentials validated successfully’ message before being able to save the integration
Ansible Tower
Offering availability – SaaS and On-Prem
NOTE: This integration is not functional if you are using vRA to manage only Public Clouds and your Ansible Tower is not publicly accessible. This is because a cloud proxy would be needed to access Ansible Tower from within your network but a Cloud Proxy can only be deployed in a vSphere environment (VMC on AWS or On-Prem vSphere)
Configuration:
- Name – This is a friendly name to designate the Ansible Tower configuration.
- Description – <optional> Supply additional details about this Ansible Tower integration
- Hostname – Enter the FQDN of the Ansible Tower server
- Location – Not a field within the On-Prem offering. Select Private Cloud if you requiring a Cloud Proxy to access your Ansible Tower environment even if it resides in AWS, Azure, GCP or other cloud. Select Public Cloud if your Ansible Tower environment is accessible via a public IP. This is not a stated best practice from Ansible.
- Cloud proxy – Only visible when selecting Private Cloud from the SaaS offering. This requires that you have setup the needed cloud proxy. See the article about Cloud Proxies for details on deploying one.
- Username – Enter the username with appropriate permissions in Ansible Tower
- Password – Enter the password for the account above
- Validate button – You must click on validate and receive ‘Credentials validated successfully’ message before being able to save the integration
Bitbucket
Offering availability – On-Prem
Cloud Health
Offering availability – SaaS
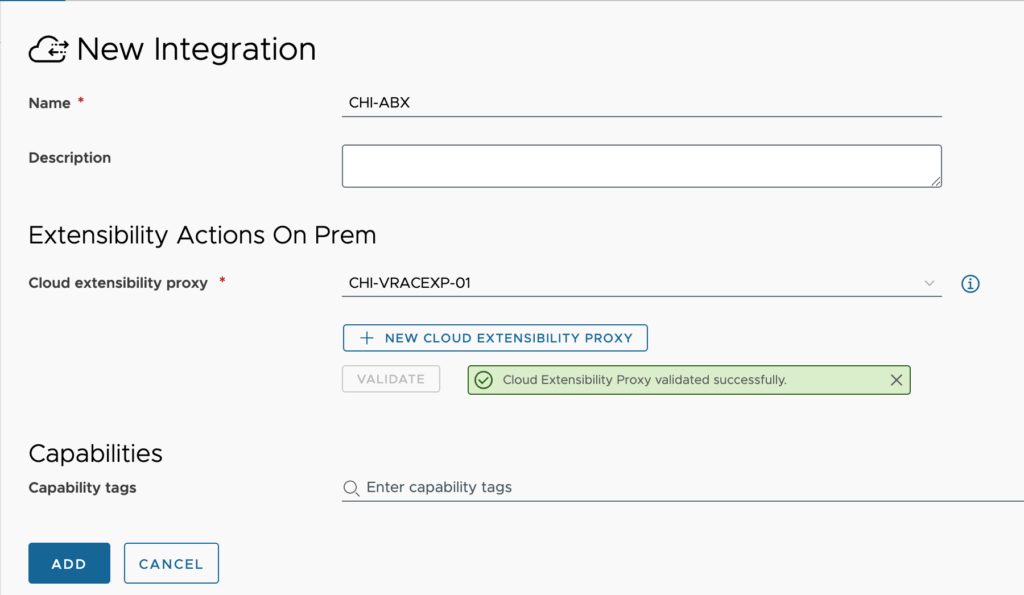
Extensibility Actions On Prem
Offering availability – SaaS
Extensibility Actions On Prem is an important integration that allows for Action Based eXtensibility (ABX) actions to be executed on-prem. This must be configured before Active Directory or IPAM integrations can be configured.
Configuration:
- Name – This is a friendly name to designate the Extensibility Actions On Prem configuration.
- Description – <optional> supply additional details about this integration
- Cloud extensibility proxy – Select the Cloud Extensibility Proxy that was deployed for this purpose. See my article about Cloud Proxies for more details about setting this up. You can use the same cloud proxy for multiple integrations (i.e. vRealize Orchestrator and Extensibility Action On Prem can both use the same one)
- Validate button – You must click on validate and receive ‘Credentials validated successfully’ message before being able to save the integration
- Capability tags – <optional> These are the tags used to define the capabilities of this integration.
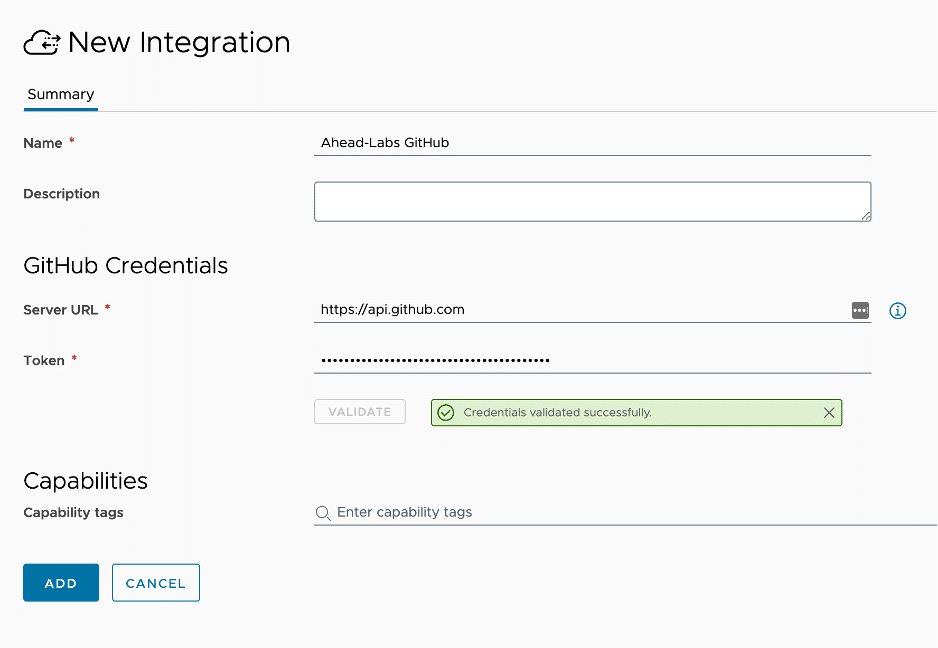
GitHub
Offering availability – SaaS and On-Prem
The GitHub integration allows you to store your Cloud Templates, ABX actions and Terraform configurations in Github on a per project basis. You can use an internal server or the SaaS offering of GitHub. Currently the integration is only a pull, so changes to code should happen in GitHub first and then synchronized to vRA.
Configuration:
- Name – This is a friendly name to designate the GitHub configuration.
- Description – <optional> supply additional details about this integration
- Server URL – For both vRA offerings, the GitHub SaaS URL is set by default. You can set this to an internal server address if you have GitHub internally.
- Token – Supply the token for the account you are planning to use with this integration
- Validate button – You must click on validate and receive ‘Credentials validated successfully’ message before being able to save the integration
- Capability tags – <optional> These are the tags used to define the capabilities of this integration.
Now that the GitHub integration is setup, we will need to apply more details per project. This is where we will configure where each resource type will exist in GitHub. Open the new GitHub integration and click on Projects as shown here.
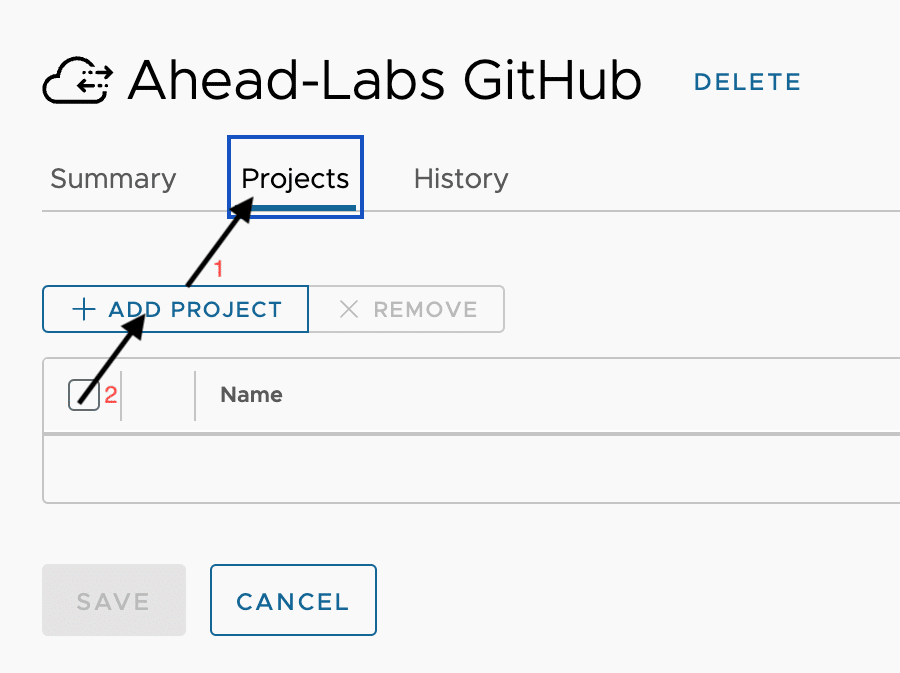
Now, select a Project from the list and click Next
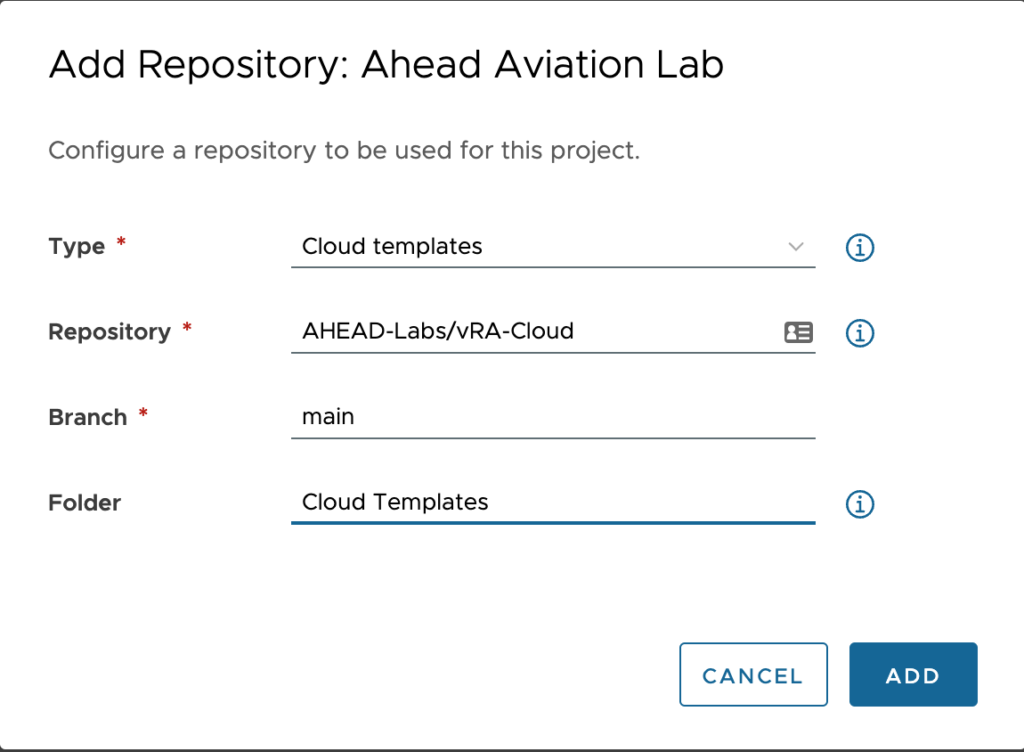
Configure the repository for each resource type you want to extract from GitHub.
Configuration:
- Type – Select from Cloud templates, Action based scripts and Terraform configurations
- Repository – Enter the repository path where the data is stored
- Branch – Enter the name of the branch you are wanting to use in this environment.
- Folder – Enter the name of the folder in the repository that contains the resources of this type.
GitHub Enterprise
Offering availability – SaaS
GitLab
Offering availability – SaaS and On-Prem
IPAM
Offering availability – SaaS and On-Prem
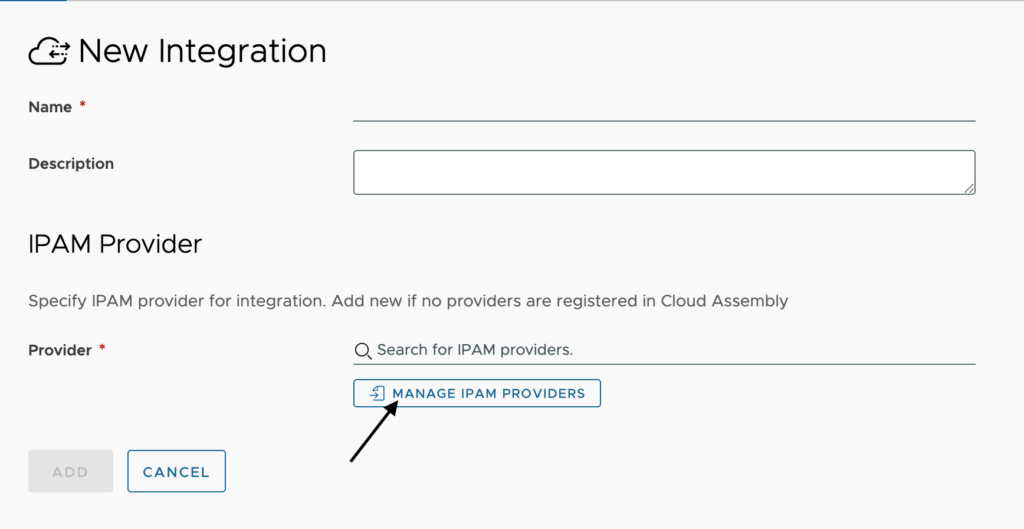
The IPAM integration is a pluggable framework that allows you to either utilize existing IPAM ‘plugins’ found on the VMware Marketplace, with the IPAM vendor, or allow you to develop your own plugin to suit your needs. The most notable of these is the now VMware maintained InfoBlox plugin. There are also plugins for SolarWinds and phpIPAM available from the community. To write your own, you will need to understand technologies like Java, Maven, Python and Docker. To configure the IPAM integration, we first need to add an IPAM integration and click the button to MANAGE IPAM PROVIDERS.
Here are some providers you can download here
- Infoblox
- SolarWinds 0.8.0
- phpIPAM 1.1.43
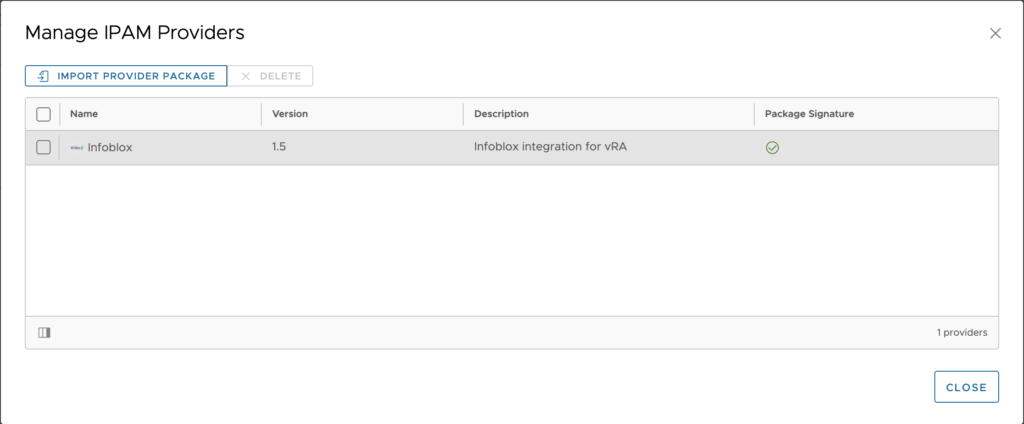
Now we need to click on IMPORT PROVIDER PACKAGE. This file should be a .zip file. Once selected you will see a progress bar showing Uploading… and the percentage complete. Once this is done it will move on to importing and then be complete and your IPAM provider should now be listed in the window.
Now you can close this windows and search for your provider in the original window. Once you select your provider, much more information will populate the screen for you to configure.
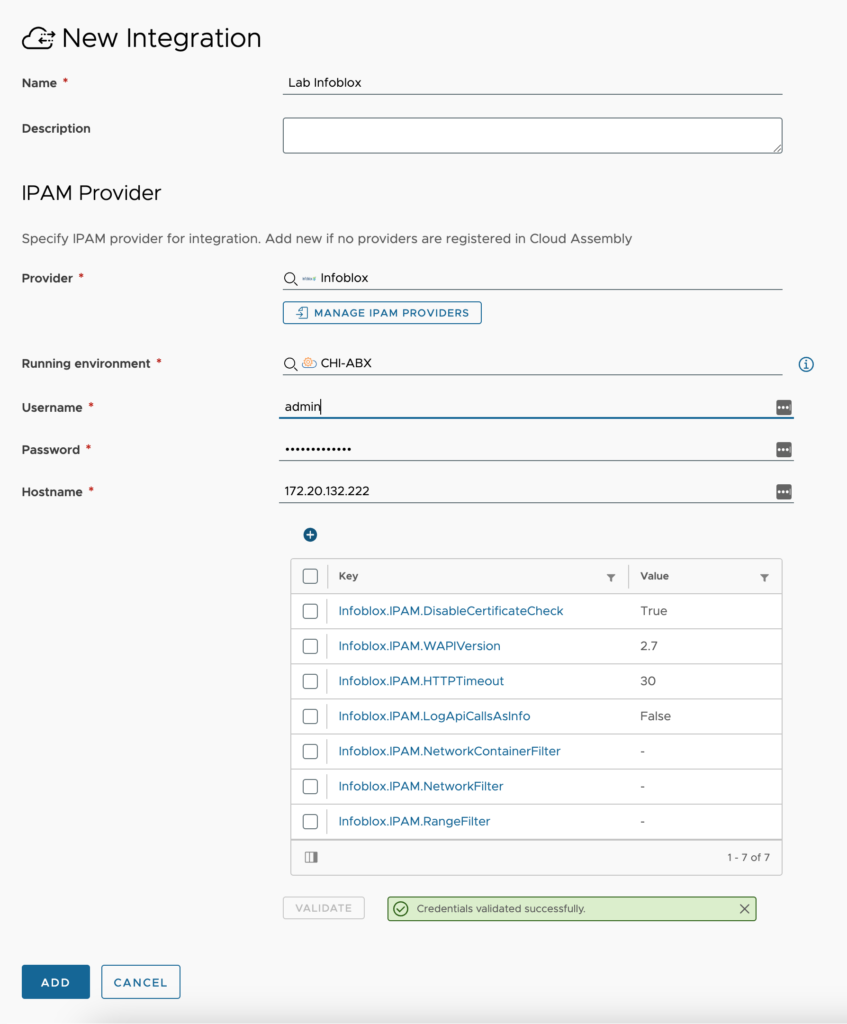
Configuration:
- Name – This is a friendly name to designate the IPAM configuration.
- Description – <optional> supply additional details about this integration
- Provider – Your IPAM provider
- Running environment – Select either an Extensibility Actions On Prem, Azure or AWS
- Username – Account with required permissions per the IPAM provider. For Infoblox, we need to be able to work with DNS zones and views as well as all subnets we will be managing IP’s in. This includes assigning and deleting both IP addresses and DNS records.
- Password – Password for the username
- Hostname – FQDN or IP address of the IPAM device
- Custom Properties – These are custom properties used to help define how the IPAM connection will work. The ones shown in the image are the default properties for InfoBlox with only one change, Infoblox.IPAM.DisableCertificateCheck has been set to true. Additional properties can be added here, but are typically not needed. You can change the WAPI version number to the latest version that your InfoBlox supports.
- Validate button – You must click on validate and receive ‘Credentials validated successfully’ message before being able to save the integration
Puppet
Offering availability – SaaS and On-Prem
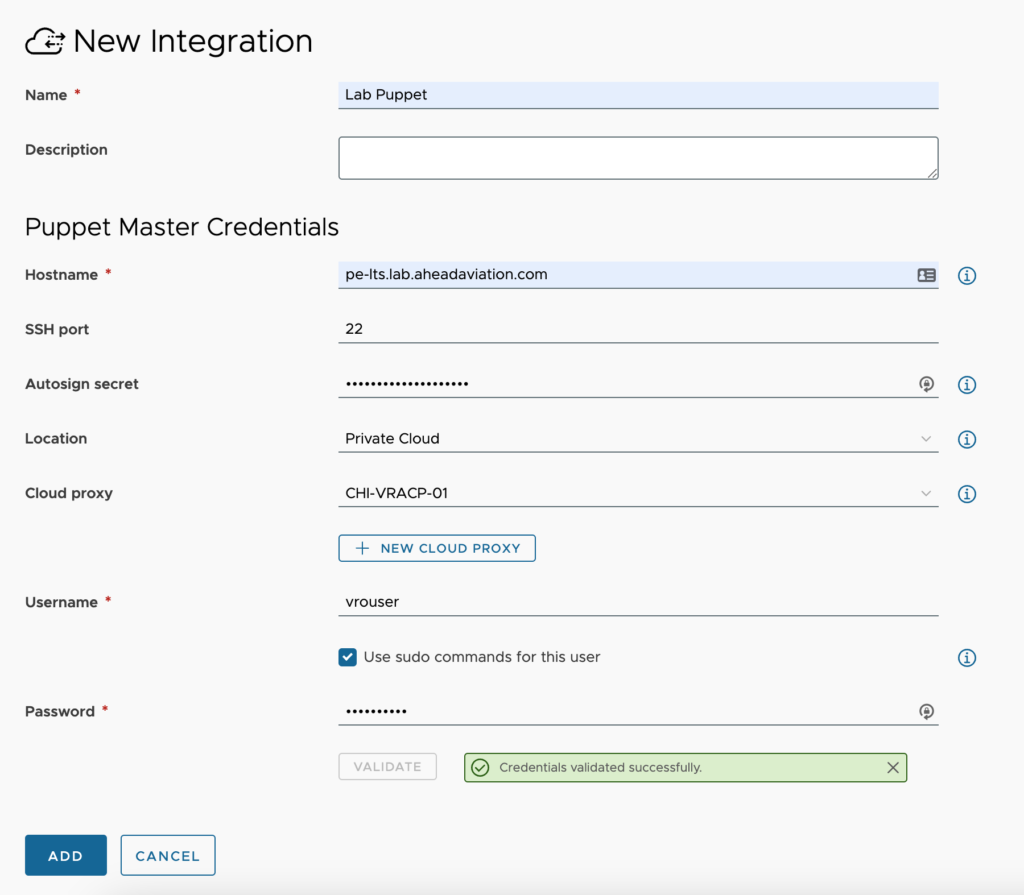
The Puppet integration allows you to setup a configuration for your Puppet environment. Using this integration requires you to drag a Puppet Agent object into you Cloud Template canvas and configure it. You can find details for this in another article.
Configuration:
- Name – This is a friendly name to designate the Puppet configuration.
- Description – <optional> supply additional details about this integration
- Hostname – FQDN or IP address of the IPAM device
- SSH port – The default is 22, but if you have changed the SSH port for this puppet node, change the port here
- Autosign secret – The password used to autosign the nodes certificate in Puppet.
- Location – Not a field within the On-Prem offering. Select ‘Private Cloud’ if you require a Cloud Proxy to access your Ansible Tower environment even if it resides in AWS, Azure, GCP or other cloud. Select Public Cloud if your Ansible Tower environment is accessible via a public IP. This is not a stated best practice from Ansible.
- Cloud proxy – Only visible when selecting Private Cloud from the SaaS offering. This requires that you have setup the needed cloud proxy. See the article about Cloud Proxies for details on deploying one.
- Username – This username is the account that vRealize Automation will use to connect to the Puppet master. Agent installation account details are provided in the Cloud Template.
- Use sudo commands for this user – Check this box if the account is not a root account or member of a group with sudo permissions.
- Password – Password for the above Username
Red Hat OpenShift
Offering availability – SaaS and On-Prem
SaltStack Config
Offering availability – SaaS (License Required) and On-Prem
SaltStack is a great tool that is used for desired state configuration and monitoring. You can use it to check disk usage of systems or list installed software, but you can make changes to servers as well like applying firewall settings to a Windows server or setting up a RedHat server as an Apache web server.
NOTE: If trying to setup SaltStack Config in the SaaS offering, you need to be subscribed to the SaltStack Config service. The below details fall in line with the On-Prem offering.
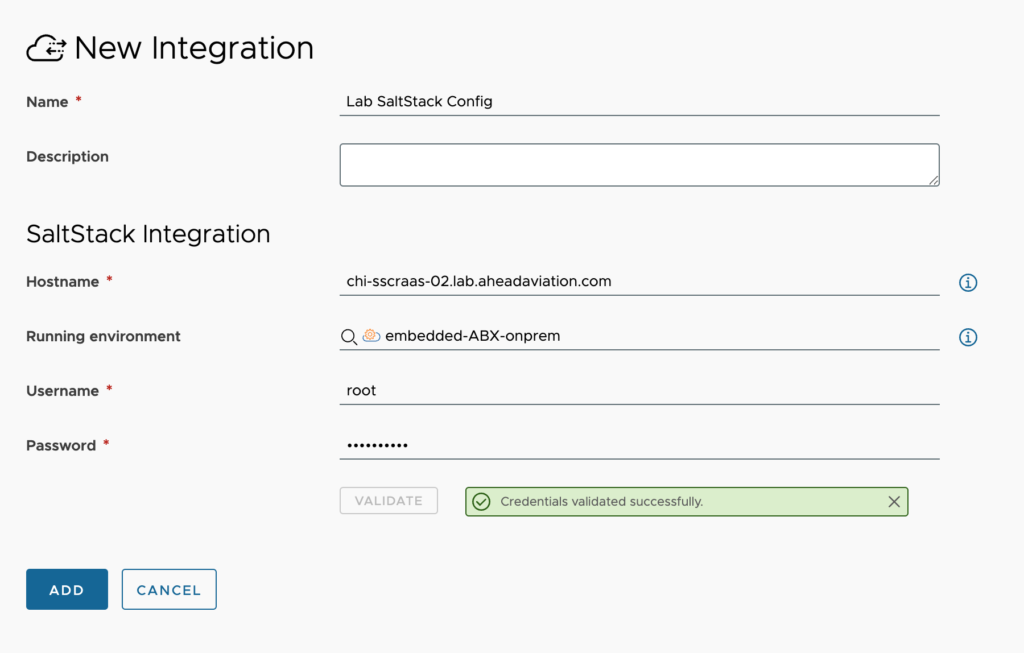
Configuration:
- Name – This is a friendly name to designate the IPAM configuration.
- Description – <optional> supply additional details about this integration
- Hostname – Enter the FQDN or IP of the server running the RaaS service. For single node builds it’s just the one server, for Standard Deployments (4+ nodes) the server that is the RaaS server or VIP for the RaaS servers.
- Running environment – If running this On-Prem, this should be the embedded-ABX-onprem
- Username – Enter the username with permissions in SaltStack Config
- Password – Enter the password for the above user.
SDDC Manager
Offering availability – On-Prem
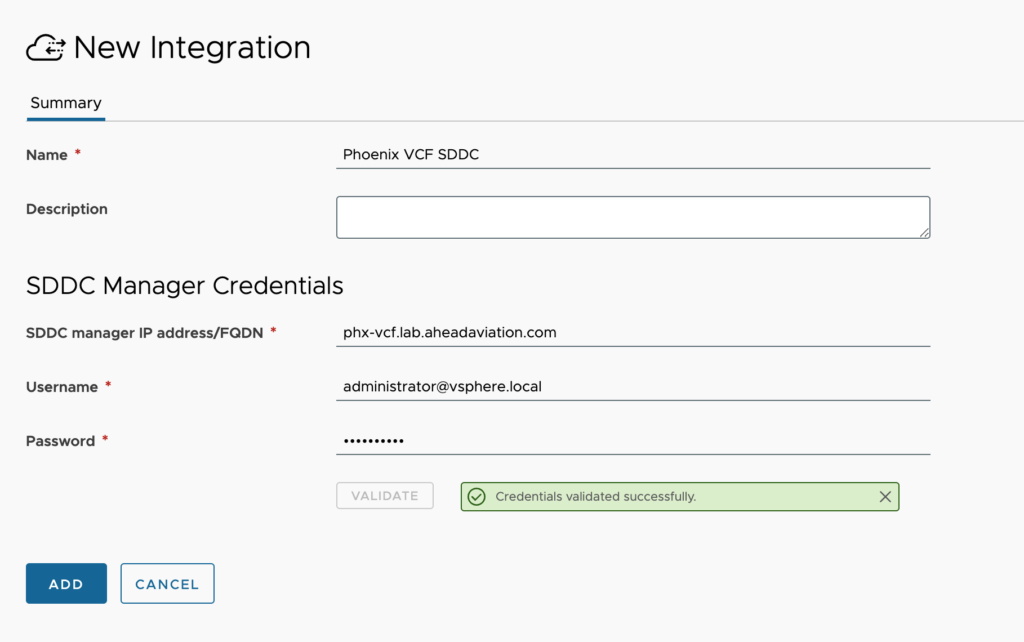
This integration is primarily used to connect to the SDDC Manager of a VMware Cloud Foundation (VCF) environment. This integration is required for setting up a VCF Cloud Account. If you attempt to setup a VCF Cloud Account prior to setting up an SDDC Manager integration, you will be notified that there is no integration and that you must complete that task first.
Configuration:
- Name – This is a friendly name to designate the SDDC Manager configuration.
- Description – <optional> supply additional details about this integration.
- SDDC manager IP address/FQDN – Enter the FQDN or IP of the SDDC Manager.
- Username – Enter the username with permissions in SDDC Manager.
- Password – Enter the password for the above user.
Tanzu Mission Control
Offering availability – SaaS
Terraform Runtime
Offering availability – On-Prem
VMware Enterprise PKS
Offering availability – SaaS and On-Prem
vRealize Automation 7.x
Offering availability – SaaS and On-Prem (Both require a license)
NOTE: Regarding the licensing for both SaaS and On-Prem, you will need the vRealize Cloud Universal or vRealize Suite Universal licensing to use this feature.
vRealize Automation 8.x
Offering availability – SaaS and On-Prem (Both require a license)
NOTE: Regarding the licensing for both SaaS and On-Prem, you will need the vRealize Cloud Universal or vRealize Suite Universal licensing to use this feature.
vRealize Operations Manager
Offering availability – On-Prem
vRealize Operations is VMware’s performance and pricing monitoring and metrics application. This integration can provide pricing for all users to see when requesting machines in Service Broker. It will also provide Insights and Alerts tabs in your Cloud Zones that are monitored by this integration.
Configuration:
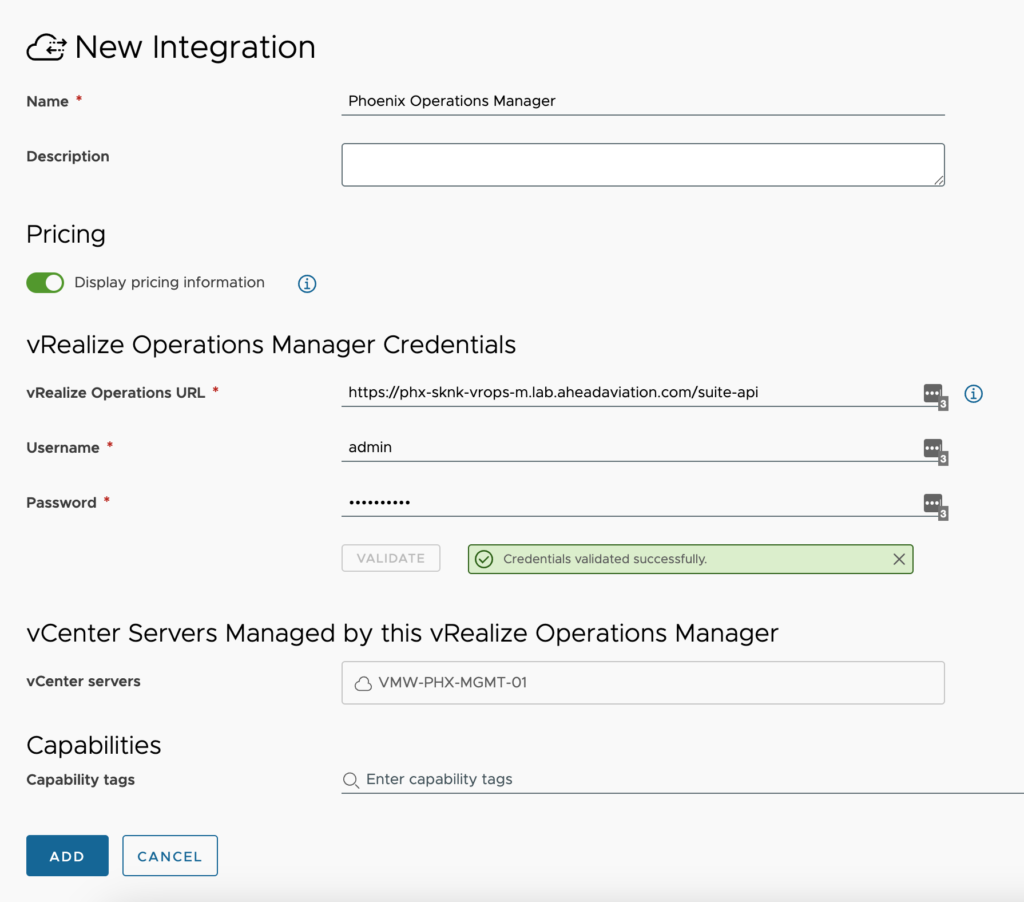
- Name – This is a friendly name to designate the vRealize Operations Manager configuration.
- Description – <optional> supply additional details about this integration
- Display pricing information – If enabled, pricing information is displayed for all users in Cloud Assembly and Service Broker. If disabled, pricing information is hidden.
- vRealize Operations URL – This is the API address of the vRealize Operation Manager not the data collector. Format is https://<FQDN of Manager>/suite-api
- Username – A username with permissions to connect to vRealize Operations Manager. This integration only reads data from vRealize Operations Manager so I just use the admin account.
- Password – The password for the above account
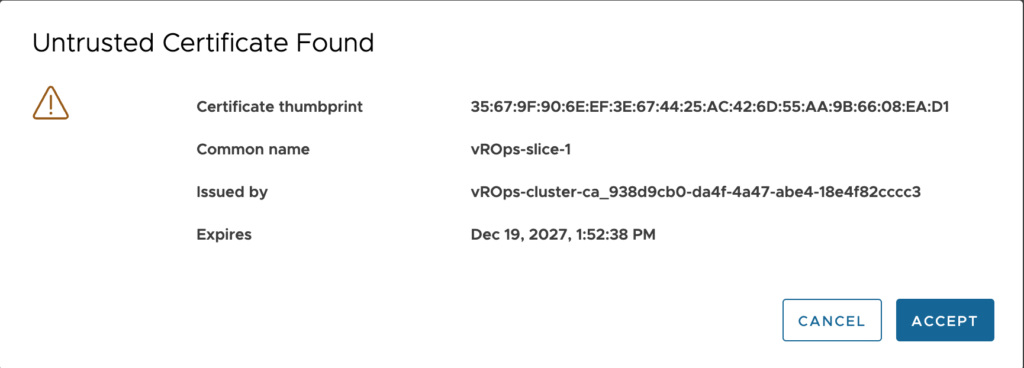
- Validate button – You must click on validate and receive ‘Credentials validated successfully’ message before being able to save the integration. When you click Validate the first time, you will need to accept the certificate
- vCenter servers – This is just a display of the vCenters that are detected by the integration.
- Capability tags – <optional> These are the tags used to define the capabilities of this integration
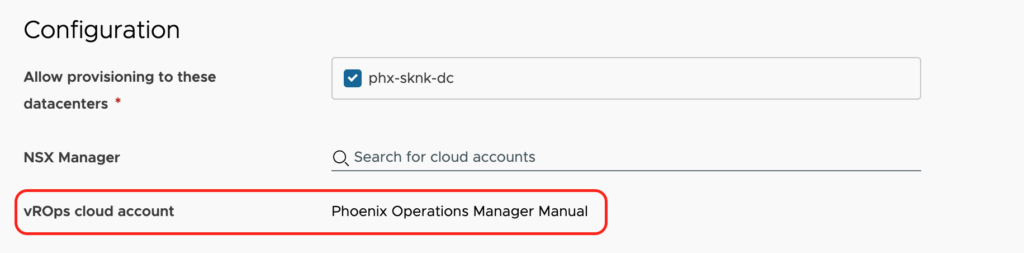
Once setup, you will see new information in your monitored cloud accounts as shown below.
When new vCenter servers are added to this vRealize Operations Manager, you will come back into this integration and click on Sync under the list of vCenter servers.

vRealize Orchestrator
Offering availability – SaaS and On-Prem
vRealize Orchestrator is another vRA component that allows for additional extensibility through actions and workflows. In most cases, anything you are unable to accomplish with ‘out of the box’ functionality within vRA can be passed over to vRO and you can utilize the existing workflows and actions or develop your own using PowerCLI, Python, Node.js or JavaScript.
With an On-Prem solution, vRO is built in to the vRA appliance and when vRA is initialized, the vRealize Orchestrator integration is added for you. You can add additional Orchestrators following the below details for the SaaS offering but you will not be asked for a Cloud extensibility proxy or refresh token.
Configuration:
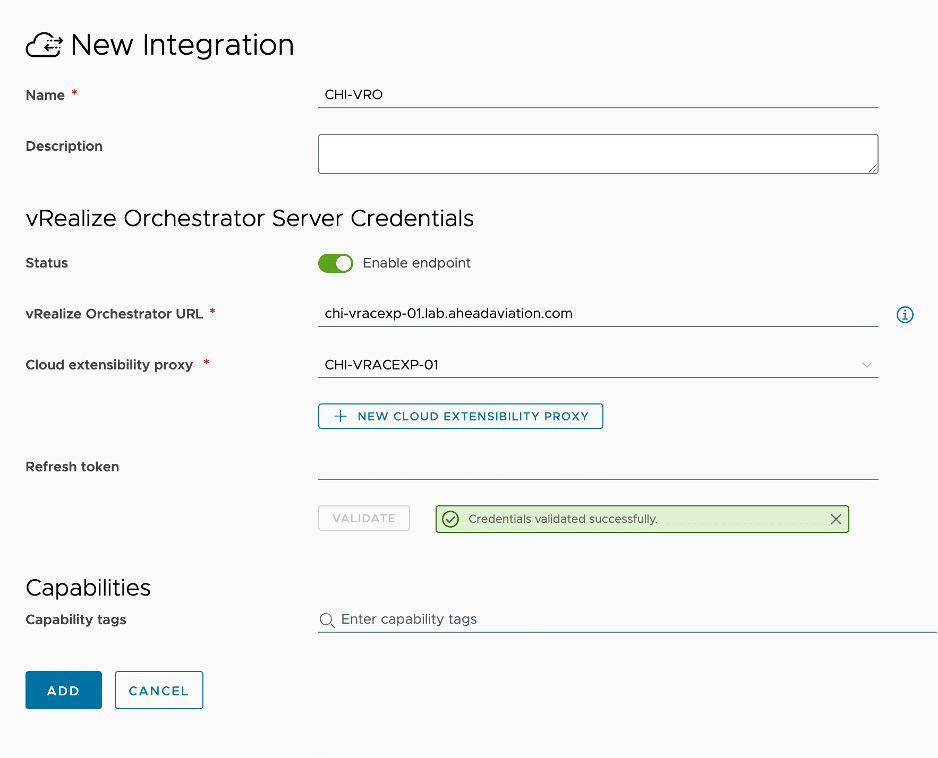
- Name – This is a friendly name to designate the Extensibility Actions On Prem configuration.
- Description – <optional> supply additional details about this integration
- Status – Enable or Disable the vRealize Orchestrator instance
- vRealize Orchestrator URL – supply the FQDN of the orchestrator instance. This could be the Cloud extensibility proxy itself or another Orchestrator accessible to the selected Cloud extensibility proxy.
- Cloud extensibility proxy – Select the Cloud Extensibility Proxy that was deployed for this purpose. See my article about Cloud Proxies for more details about setting this up. You can use the same cloud proxy for multiple integrations (i.e. vRealize Orchestrator and Extensibility Action On Prem can both use the same one)
- Refresh token – <optional>
- Validate button – You must click on validate and receive ‘Credentials validated successfully’ message before being able to save the integration
- Capability tags – <optional> These are the tags used to define the capabilities of this integration.
You might also like

Leave A Reply