Network profiles allow us to group networks and their configurations together and control how they are consumed. Without network profiles, each cloud template would need to configure the specifics of each network it would connect to like domain, address, gateway etc. vRealize Automation can use networks that are DHCP enabled or Static IP assignment. With static assignment networks, vRealize Automation can either act as your IPAM provider or can utilize integrations with 3rd party providers like Infoblox, phpIPAM or Solarwinds. You could even write your own integration, but we won’t get into that here. Let’s go ahead and set one up allowing vRealize Automation to be the IPAM provider for one network and leaving one as DHCP. I’ll touch on using a 3rd party at the end of this article.
When designing your network profile layout, we need to understand how things are applied so we don’t go overboard on network profiles, but still get the most out of them. Here are a few things I keep in mind with network profiles when designing them.
- Each network profile maps to a single region. You can build multiple network profiles using the same region but are not able to assign multiple regions to the same network profile.
- Each capability tag assigned to the network profile will apply to every network that you add within it. So, make sure they all fit with the capability.
- Each security group assigned to the network profile will apply to every network that you add within it. There is no way to be selective of which security groups apply to which networks.
NOTE: The Security Groups tab will disappear if you select a vSphere region that is not connected to an NSX-V or NSX-T cloud account. This is because you do not have security groups available without NSX.
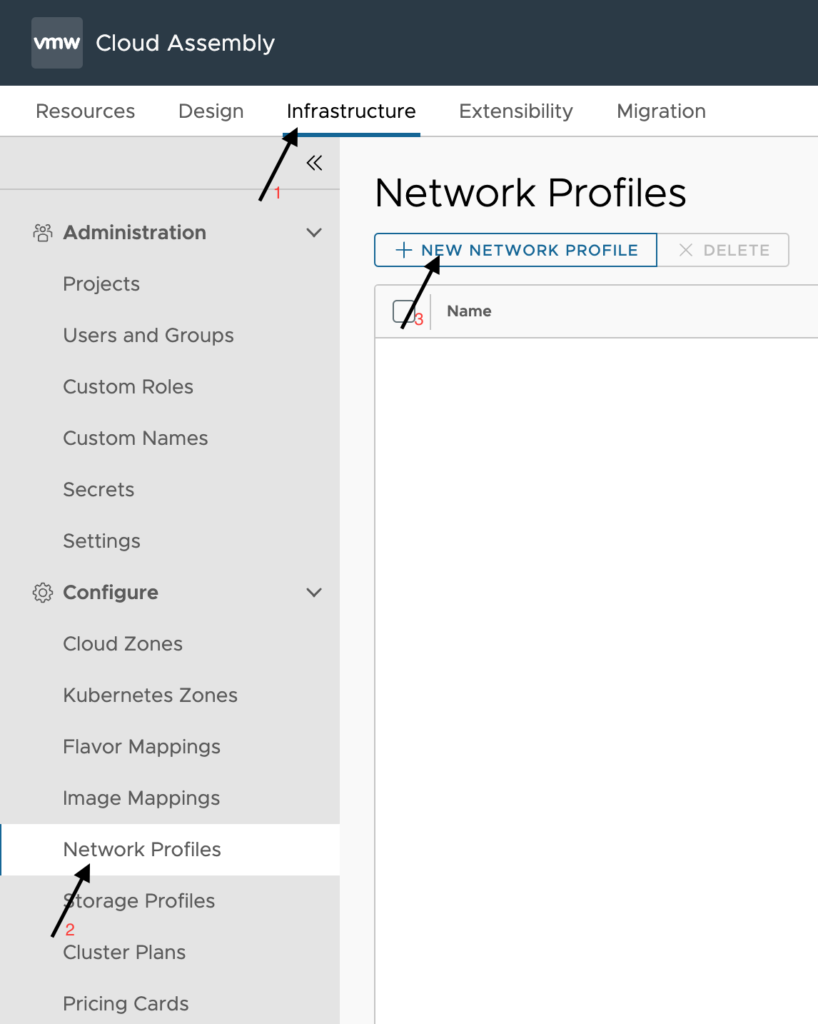
To begin creating a network profile, first click on Infrastructure > Network Profiles > New Network Profile as shown below.
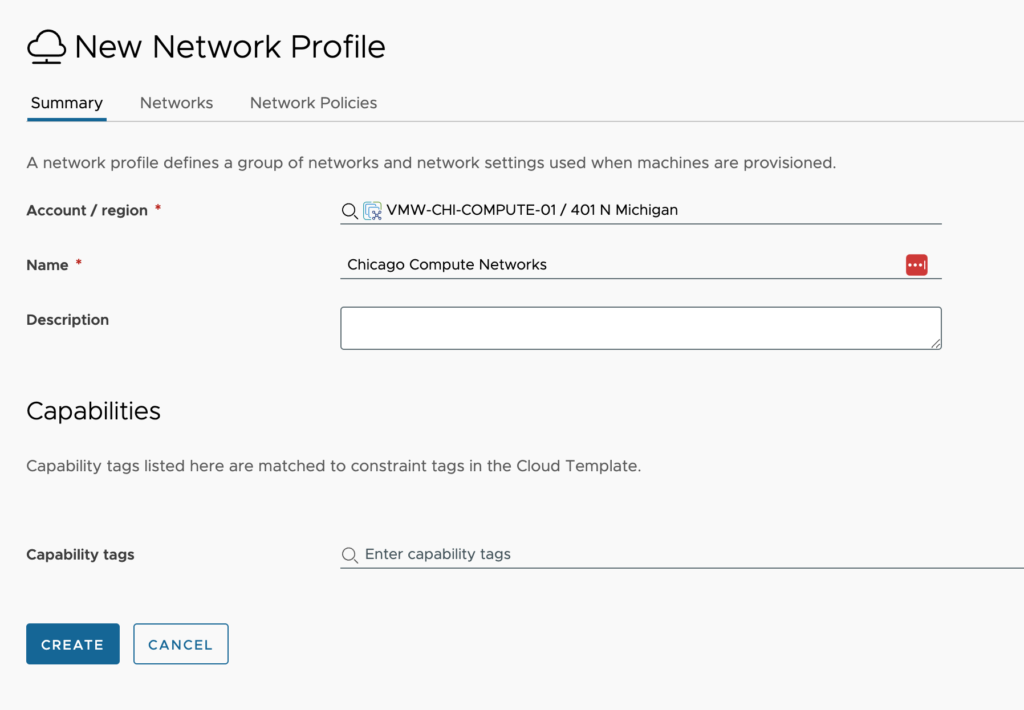
The first thing we will do on the Summary tab is to select a region. A list of all regions will drop down once you click the field, if you have too many regions to display then you can click ‘show all’ at the bottom of the drop down.

The remainder of the summary tab is straight forward.
Configuration:
- Name – This is a friendly name to designate this network profile. When working in larger environments, I tend to use the region name and something that signifies how this network profile is different than others within the same region. I will keep it easy here since I have only one cluster.
- Description – <optional> Supply additional details about this network profile.
- Capability tags – <optional> These are the tags used to further define the capabilities of all the networks in this network profile.
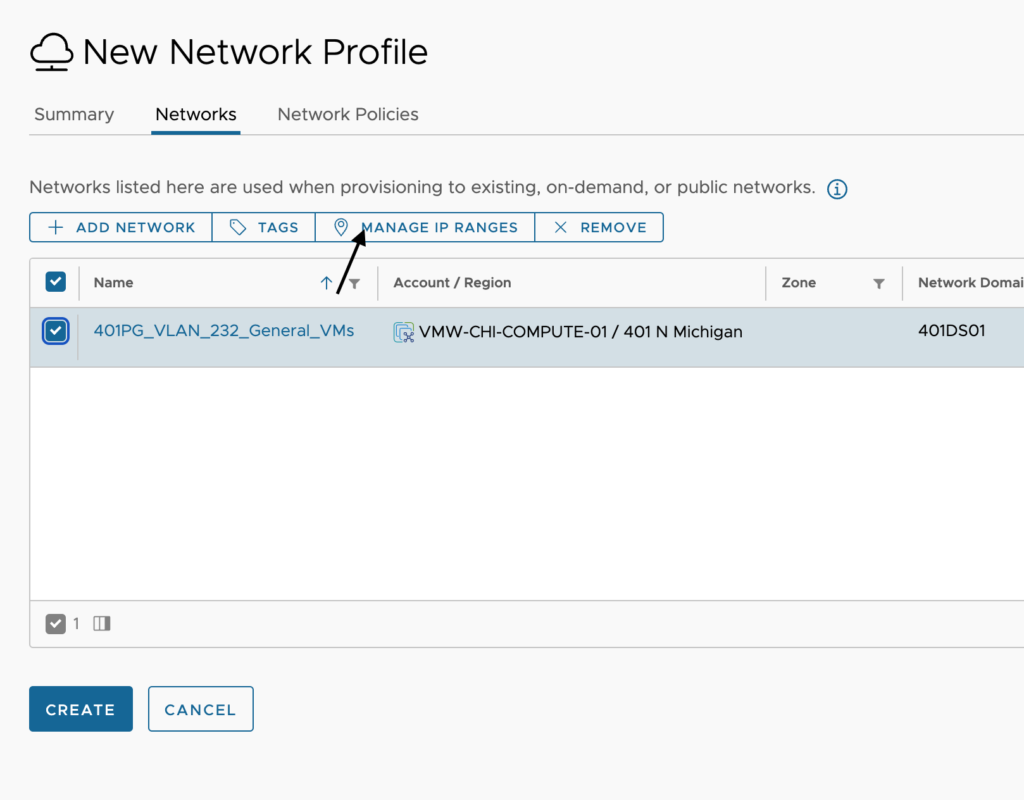
Next up, click over to the Networks tab and begin adding all the networks that fit the capability of this network profile. To begin, click Add Network.

First, I am adding in the network I want to do static IP assignment and use vRealize Automation for IPAM. For us to properly manage this range, we need to now set some property values for this network. You can set these properties without doing it through the network profile, by clicking on Infrastructure > Networks and finding the network to set the properties.

Once we click on the network, you will see a window like the one below. The Name field shows us the name of the network from the region, so in our case with vSphere, this is the network in vCenter. We also see the Network domain, which in this case with vSphere is the name of the standard or distributed switch. In public cloud, it would reference the VPC. Let’s fill out the other properties with the needed values.
Configuration:
- Domain – the DNS domain name that is associated with the machines on this network.
- IPv4 CIDR – The network/subnet for the network (ex. 10.200.0.0/16 or 172.20.232.0/24)
- IPv4 default gateway – The default gateway address for this network
- IPv6 CIDR – The network/subnet for the network (ex. 2001:4860:4860::8888/32)
- IPv6 default gateway – The default gateway address for this network
- DNS servers – List all DNS servers either separated by commas or one per line as I have shown below
- DNS search domains – List all the domains that should be listed as search suffixes on the servers deployed here.
- Support public IP – Select to flag the network as public. Network components in a Cloud Template that have a “network type: public” property are matched to networks that are flagged as public.
- Default for zone – When no profile can be determined through use of capability tags, this box, when checked, will make this network the default place to drop machines.
- Tags – These are the tags used to further define the capabilities of this network in this network profile. I am setting a tag to notate this is for static deployments.
Once all properties here are filled out that need to be, we can click Save.

Now we need to create 1 or more IP ranges within this network that vRealize Automation can issue out to servers. To do this, click the check box next to the network and then click Manage IP Ranges.
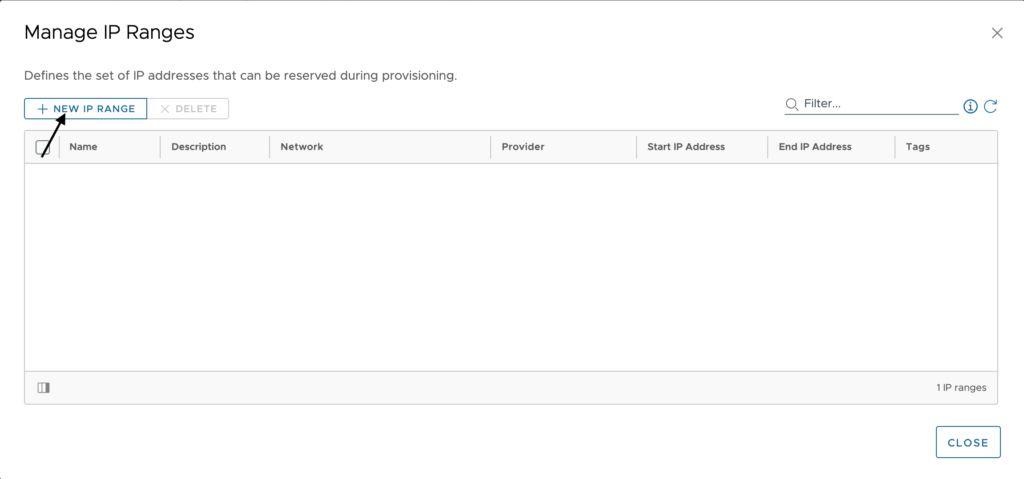
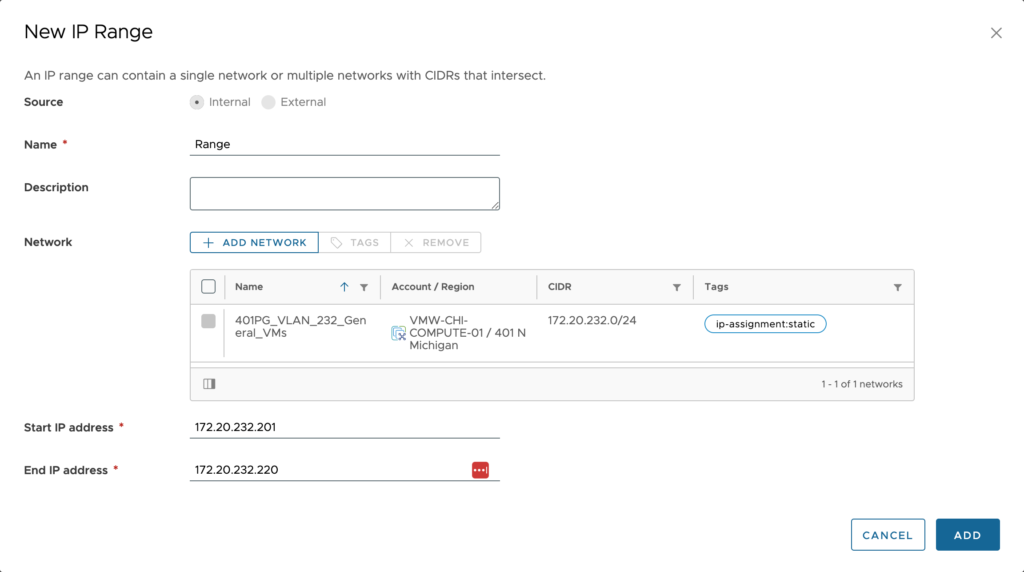
Here we would see all IP ranges that have been setup for this network. You can add as many as you need, but I recommend trying to create them as large as possible to keep it easier to manage. You cannot exclude IP addresses from a range which is why you would need to setup multiple in the first place. To setup a new one, click on New IP Range.
The source here can either be Internal or External. Internal simply means that vRealize Automation will manage the IPs for us and External means that we will be working with a 3rd party solution. If we did not set the properties as previously shown, we would only be able to select an external source. Another thing to keep in mind is that you are not able to mix internal and external ranges within the same network, so if you already have 1 range as internal, you will only be able to have additional internal ranges.
Configuration:
- Name – Provide a name for this range. When adding many ranges make sure you are specific enough in the name to be helpful in finding the range for troubleshooting purposes.
- Description – <optional> Supply additional details about this network profile.
- Network – Select all networks that this range applies to. Since the networks are broken down by region, you may have the same network subnet in multiple regions as with stretch layer 2 or multiple virtual datacenters within a single vCenter.
- Start IP address – The first IP in this range you want to be able to assign.
- End IP address – The last IP in this range you want to be able to assign.
Click Add to save this range. Repeat these steps for additional ranges for this network. Once done adding ranges you can close the window to go back to the main network profile window.
Once you have ranges in place and are beginning to use them, you can click back into the range to see a dial gauge showing total number of IPs in the range and how many are in use.

Finally, we have the Network Policies tab. These settings are used when a Cloud Template requires networkType: outbound or networkType: private or when an NSX network requires networkType: routed.
Outbound networks allow one-way access to upstream networks. Private networks do not allow any outside access. Routed networks allow East/West traffic between the routed networks. The existing and public networks in this profile are used as the underlying or upstream networks.
Tags can be used to specify which networks are available to the Cloud Template.
In our case, we can choose to setup isolation using On-demand networks by carving out smaller subnets from the main network subnet range. For example, taking a larger /24 network and making several /29 networks within it. When NSX-V or NSX-T is connected to the Account / Region of this network profile, we would also see On-demand security group as an option
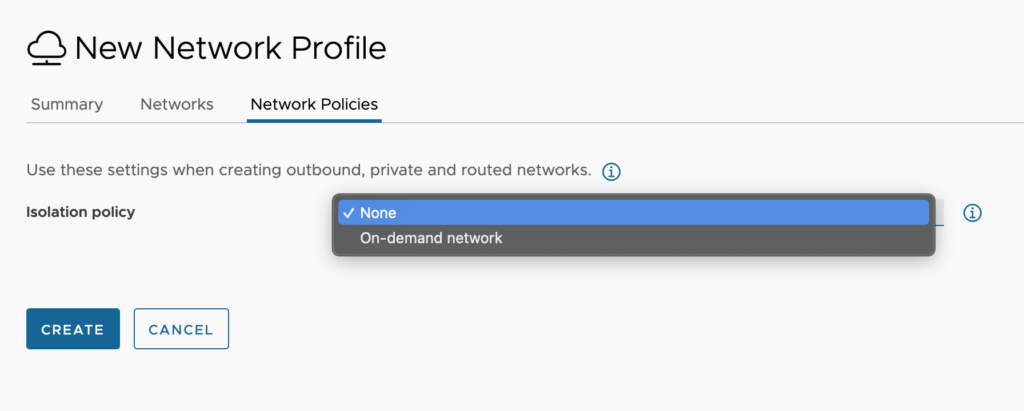
Configuration:
- Isolation policy – Select one of the following options
- None: Cloud Templates that require an outbound or private network are not matched to this profile.
- On-demand network: A subnet is created for each deployment using these settings. This method may be better for smaller networks with fewer IP addresses.
- On-demand security group: Traffic rules for the deployment are defined by a security group. This method may be more efficient for large networks but uses more IP addresses.
- Network Domain – An on-demand network with outbound access requires an existing subnet that has outbound access. Select an existing subnet to specify which subnet provides outbound access for on-demand networks that contain the outbound network type. An external subnet is only used to provide outbound access if requested in the Cloud Template, it does not control network placement.
- Source – Again, this refers to where IPAM is handled. Internal would be for vRealize Automation to handle and external would be handled by a 3rd party product.
- CIDR – The network address range to be used during provisioning to create isolated subnets. The CIDR address should be large enough, for example 172.20.232.0/24, to create multiple isolated subnets in a deployment.
- Subnet size – Size of the on-demand network created for each isolated network in a deployment that uses this profile. In my case, I am creating groupings of 6 IP’s within the larger subnet and vRealize Automation will block out these IP’s in their entirety for each deployment.

Using a 3rd party tool to manage IPs
Using a 3rd party tool to manage IPs is a very common practice with vRealize Automation. The most common I see is Infoblox and I will discuss it here, but I have worked with Solarwinds, phpIPAM, BlueCat, Men & Mice and even Microsoft IPAM as well. Here are links to download the Infoblox, SolarWinds and phpIPAM plugins that I keep on hand. There may be others out there too and as I mentioned in the beginning, you can create your own for your own purposes. If you would prefer not to write your own IPAM plugin and cannot find one for you solution, you can utilize vRealize Orchestrator to be the engine that calls out to your IPAM utilizing API calls or Powershell scripts, etc.
To begin we need to make sure we already have the integration setup for Infoblox. Check out the article on Integrations for a walkthrough on setting that up first, but once that is done, the process is quite simple.
Click on New IP Range.

This time we will select External and begin filling out the remainder of the fields.
Configuration:
- Network – This will auto populate based on the network you are setting up this IP range for.
- Provider – Select the Infoblox provider which is the integration you setup previously.
- Address space – This will be a drop-down listing all the views available within Infoblox for the account we are connecting with.
- Select the IP range(s) that apply for this network.
Click Add once complete.
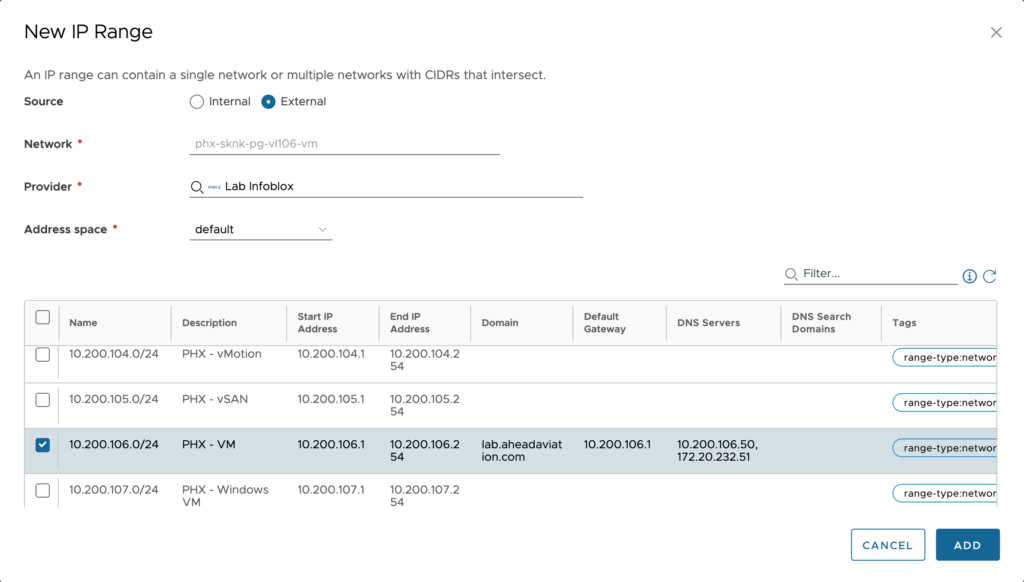
Now we will see the range(s) that we selected listed here. We can now close this window and we are done.


Leave A Reply