A Cloud Template is where we bring together everything we have been configuring inside of vRealize Automation Cloud Assembly. Here we will discuss some of the different resource types used and some of the key custom properties and input types used to create something useful that we can request from a catalog.
Cloud Templates are written and maintained in YAML code. They can be imported or downloaded at any time. There are a couple main aspects to Cloud Templates that we will cover here today, inputs and resources. Inputs are the defined set of inputs for the Cloud Template. Resources are the different components that are deployed from your request. There are a few great resources out there to help with your journey to build the right Cloud Template and I will link you to a few of my favorites.
My Favorite External Resources
Before we begin, we will need to create a new Cloud Template
Create A New Cloud Template
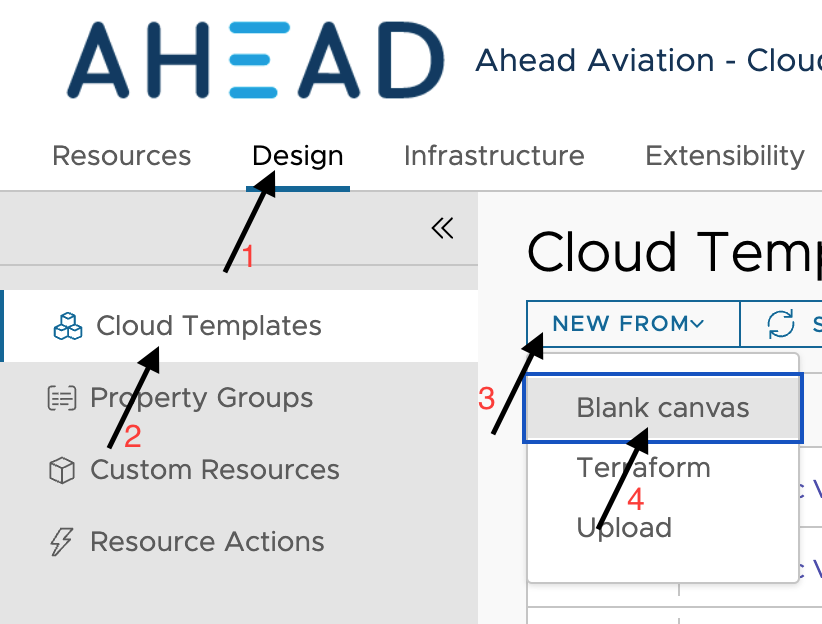
First thing we will need to do is click on Design > Cloud Templates > New From > Blank Canvas, as shown below.
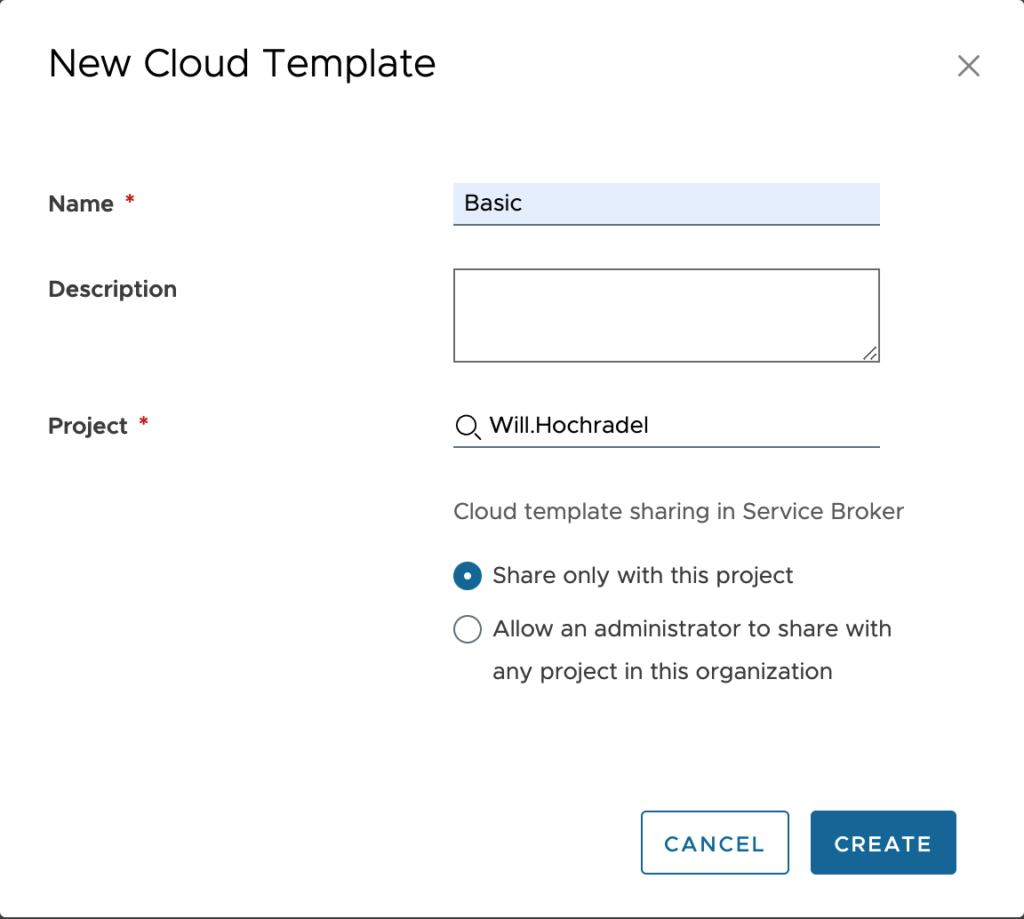
Now we need to provide some basic information about this Cloud Template to get us started.
Configuration:
- Name – Provide a name that signifies what this cloud template is. Perhaps “Basic” is sufficient, or “Windows – SQL Server – Ansible” is a better option.
- Description – <optional> Provide additional detail about this cloud template and its features. This is seen inside Service Broker by the user browsing the catalog, so it may be helpful.
- Project – Select the main project this Cloud Template belongs to.
- Cloud template sharing in Service Broker – Choose to either only allow the Cloud Template to be used by members of this project, or if a Project administrator would be allowed to share this to another project in Service Broker via Content Sharing Policies.
Click on Create to begin configuration of the new Cloud Template.
Setup Resources
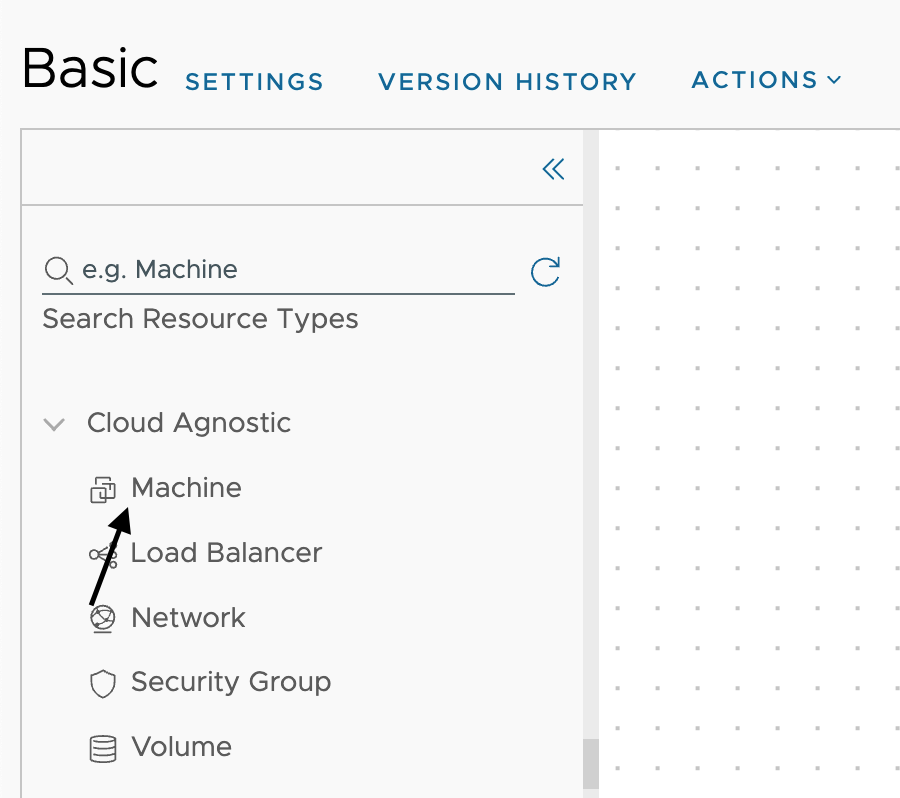
Resources are the items that are being created when requesting a Cloud Template. They cover compute, network, storage, load-balancers, applications and more. I will cover the basics here and talk about cloud agnostic resources and then explain a bit about a few to get you started. Cloud agnostic resources are Machine, Load Balancer, Network, Security Group and Volume.
Let’s go ahead and drag the Machine option over to the canvas.
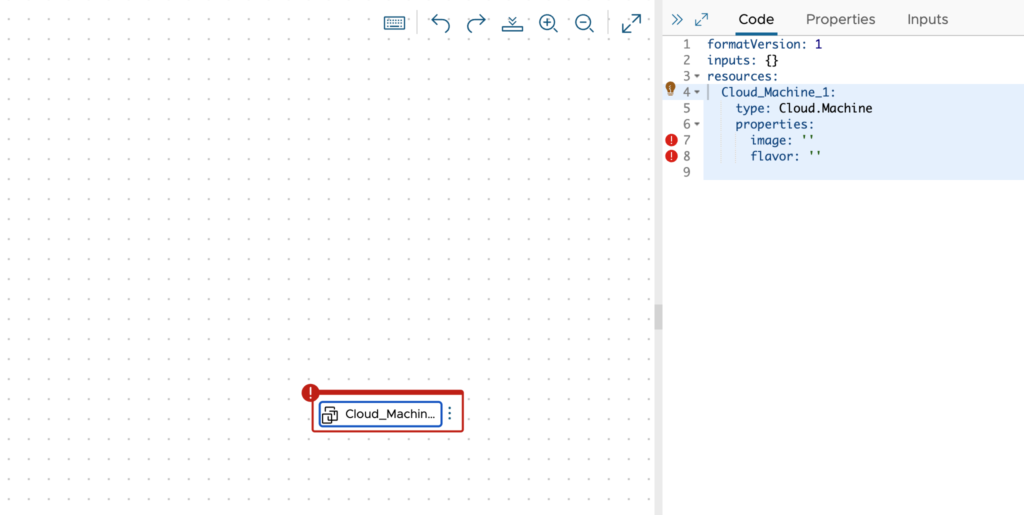
The first thing we notice is that we have a lot of red notifying us that there is an issue. When you click on a resource in the canvas, the resources code is highlighted as shown below. We can see that we have a couple of properties that are marked red, image and flavor. Image references an Image Mapping within Cloud Assembly. Flavor references a Flavor Mapping within Cloud Assembly. These must be defined in some way, and we can either statically define them or provide a selection as an input which we will discuss further into this document.
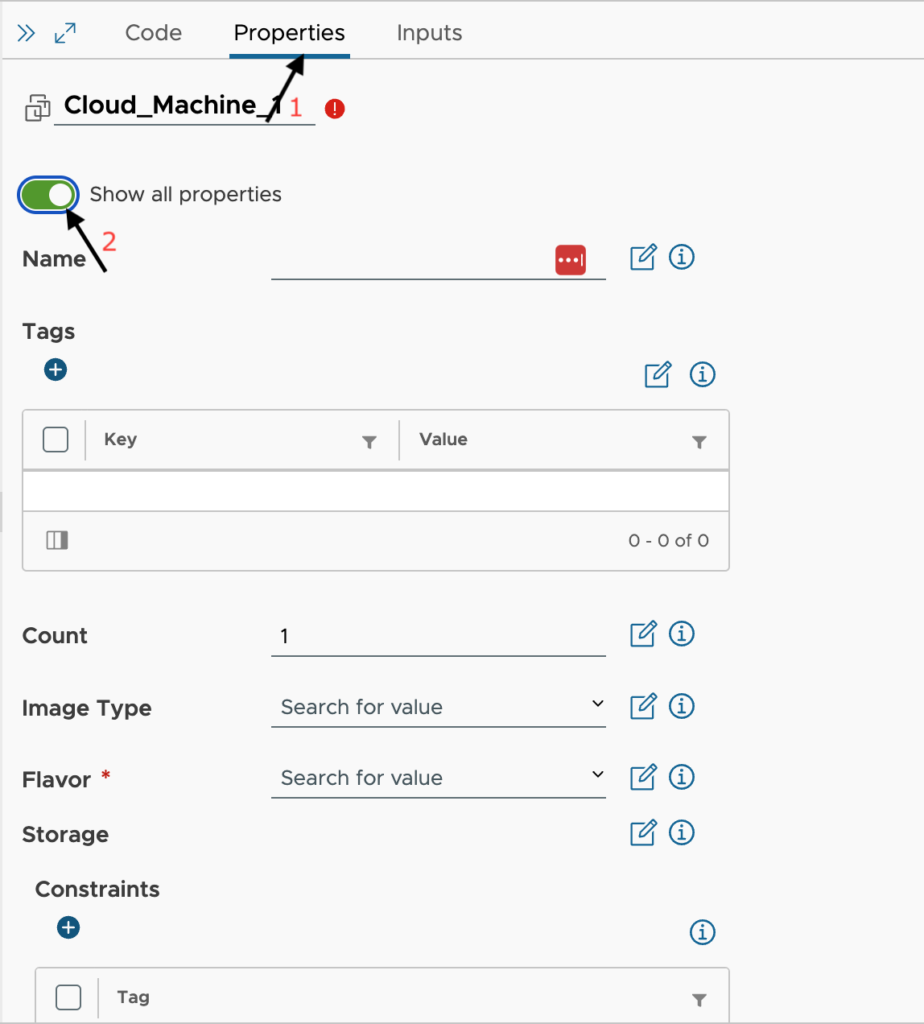
Let’s look at all the properties of the Cloud Machine resource. To do so, click on Properties and toggle Show all properties. From here we can see all properties that can be supplied to make this cloud machine as feature rich as needed.
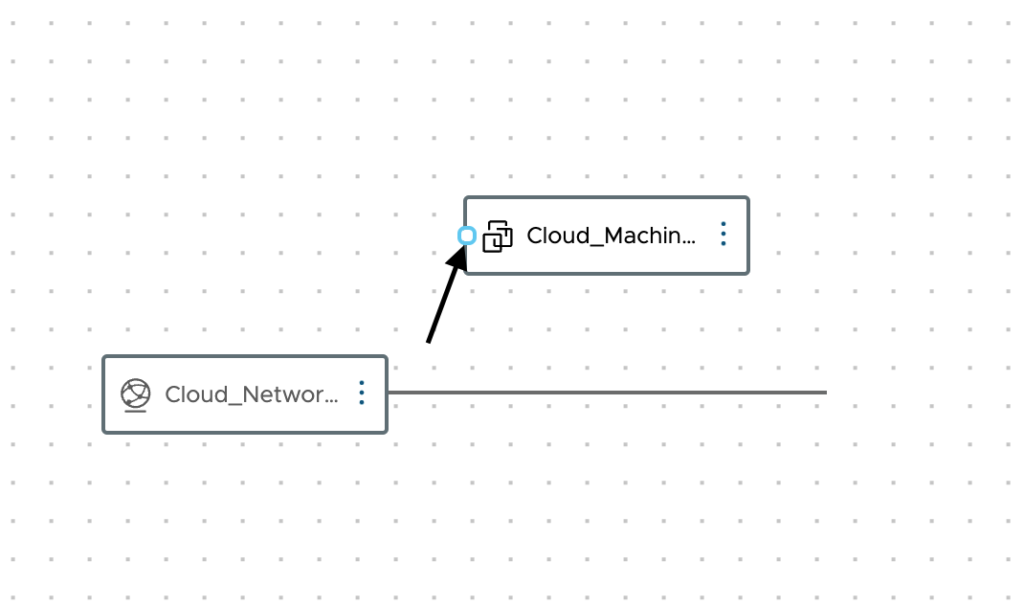
Now, let’s drag a Network resource onto the canvas as well. Once you have them both on the canvas, we need to connect the Cloud Machine resource to the Network resource. When you click on the Cloud Machine resource you will see a little dot show up the left of the resource that you can click and drag to the network. This will connect them up and update the code accordingly.
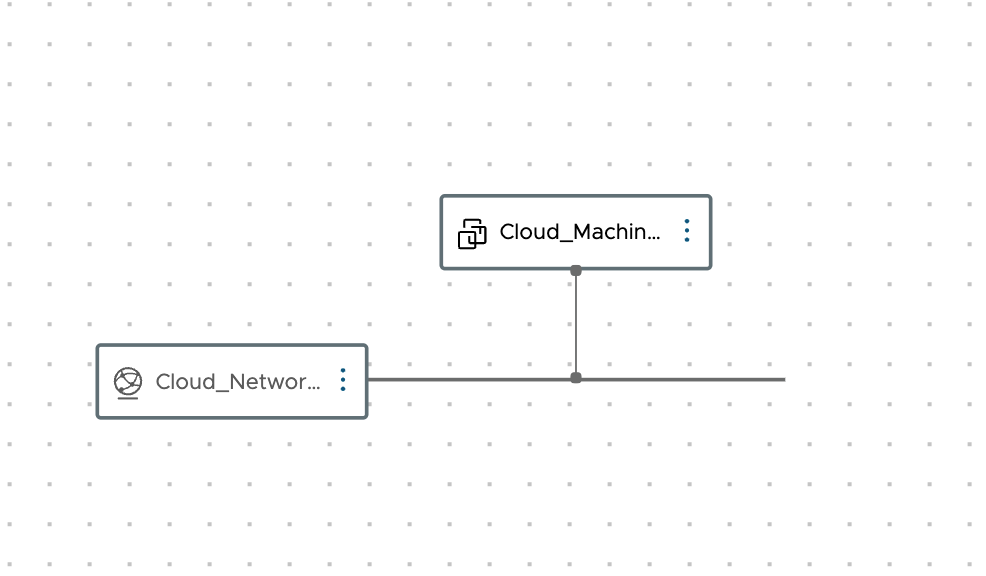
Now our code is growing, and we can see how our network is attached from the code. A new property named ‘networks’ was created and a property within that named ‘network’ that is referencing the resource name in code. If we change the Network resource name, we just need to adjust the reference to ${resource.<New Name>.id}
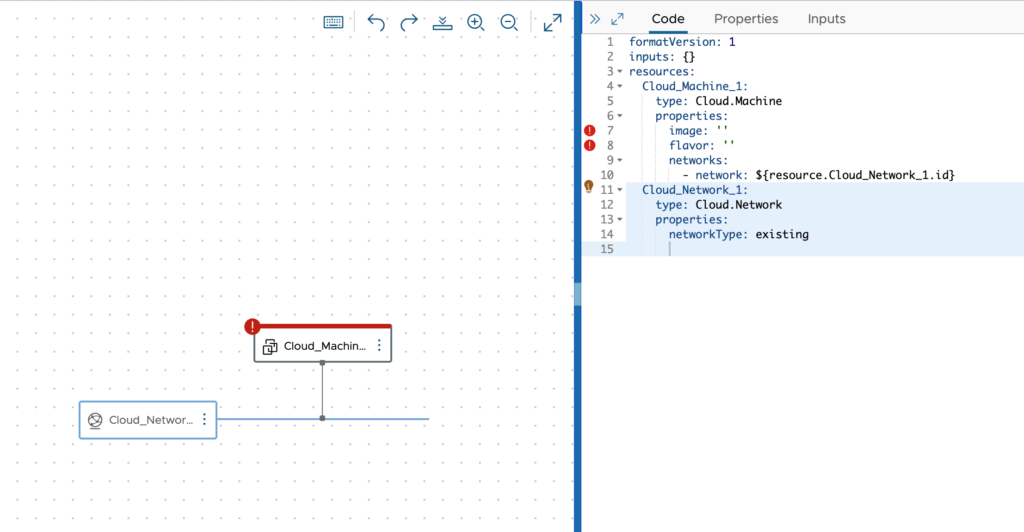
At this point we will need to setup some inputs to get enough data to work with to make sure this machine can be built to the correct network and compute environment.
Setup Inputs
Let’s look at setting up an Input with the GUI method rather than the YAML code editor. Once you are used to the YAML code and input options, there is nothing stopping you from choosing to create inputs directly in the code. As a matter of fact, I do it this way almost all the time.
To setup a new Input, click on the Inputs > New Cloud Template Input as seen below.
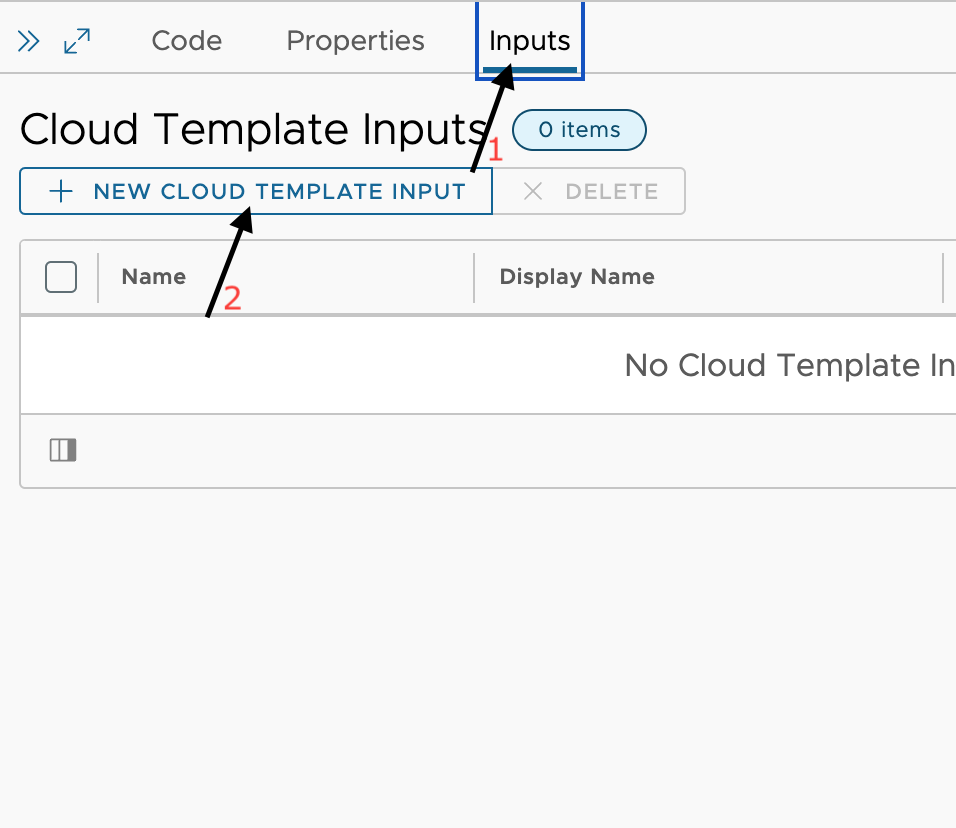
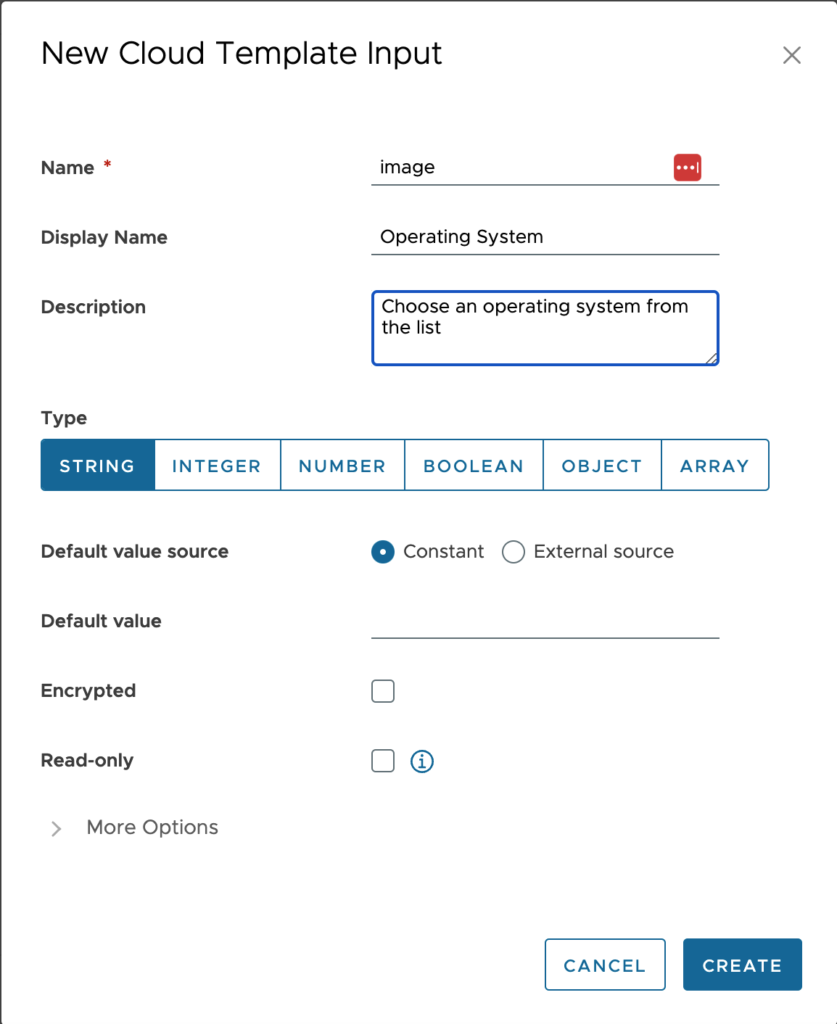
Here we will go through setting up an input for “image” that will be used to choose an image mapping in the end.
Configuration:
- Name – Set the input name for this new input. This is what is used from the coding side not the visibility side in the request.
- Display Name – Set the name you would prefer to be displayed in the request form. If this is left blank, the input name is used.
- Description – Supply some information about this input. During the request, an information icon will be to the right of the input and will display this message to the user.
- Type – Choose the type of input this should be. This will change the method of input.
- Default value source – Choose to either be a constant or external source.
- Constant – Will either display a blank field or the default value.
- External Source – This connects to a vRealize Orchestrator action to populate data into the field.
- Default value – This will be the default value in the field. If this is a drop down with several options, this would be pre-selected on the more favored option.
- Encrypted – This option will store the string as a secureString and display asterisks when filling out the field.
- Read-only – Use this especially when using an external source and you want to just display the returned data but not allow the user to modify it.
- More Options – We will discuss this further in a minute.
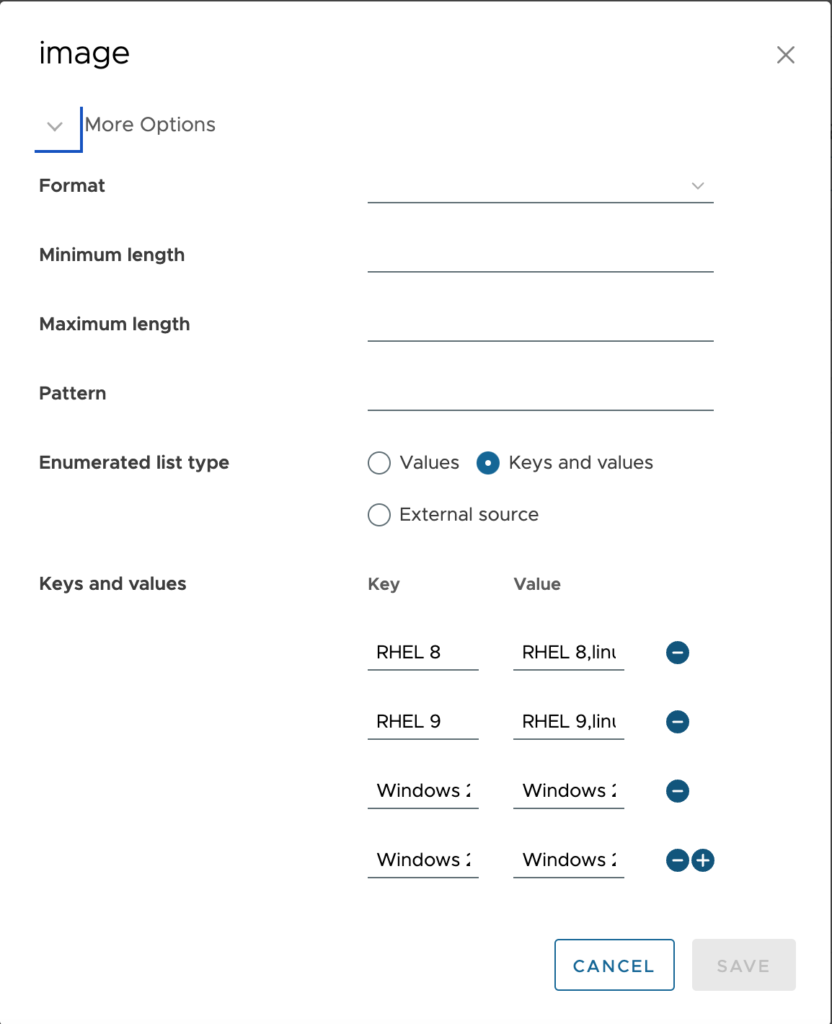
Now, I have More Options expanded out so we can go over these options as well.
Configuration:
- Format – Either no format or date/time format.
- Minimum length – The minimum number of characters. When using this field, if the requirement is not met, the field is lit red, and the user is unable to proceed.
- Maximum length – The maximum number of characters. When using this field, if the requirement is not met, the field is lit red, and the user is unable to proceed.
- Pattern – pattern matching using RegEx.
- Enumerated list type – Choose between either Value, Keys and values or External Source. External source is, again, where we would map to a vRealize Orchestrator action to provide the data.
- Values / Keys and Values – When choosing Values above, you will only have the Value field where you can supply exactly what the user will see in the request as well as the data you will have to work with in code later. Keys and Values is what I am using below. This allows us the ability to supply a behind the scenes value that we can manipulate and work with which keeping the user visible Key easy to understand.
Once you are complete, click Save.
Now that we have an input setup, let’s look at the code of this Cloud Template. You can see the image input begins on line 3 and we see the fields that we filled in previously. Notice the way that a Keys and Values option shows up as a oneOf whereas the flavor input starting on line 16 uses enum. The flavor input was set to Value as the type. I prefer to use Keys and Values when I want the backend value to be comma delimited so that I may split the value on the ‘,’ and grab each piece for a different purpose.
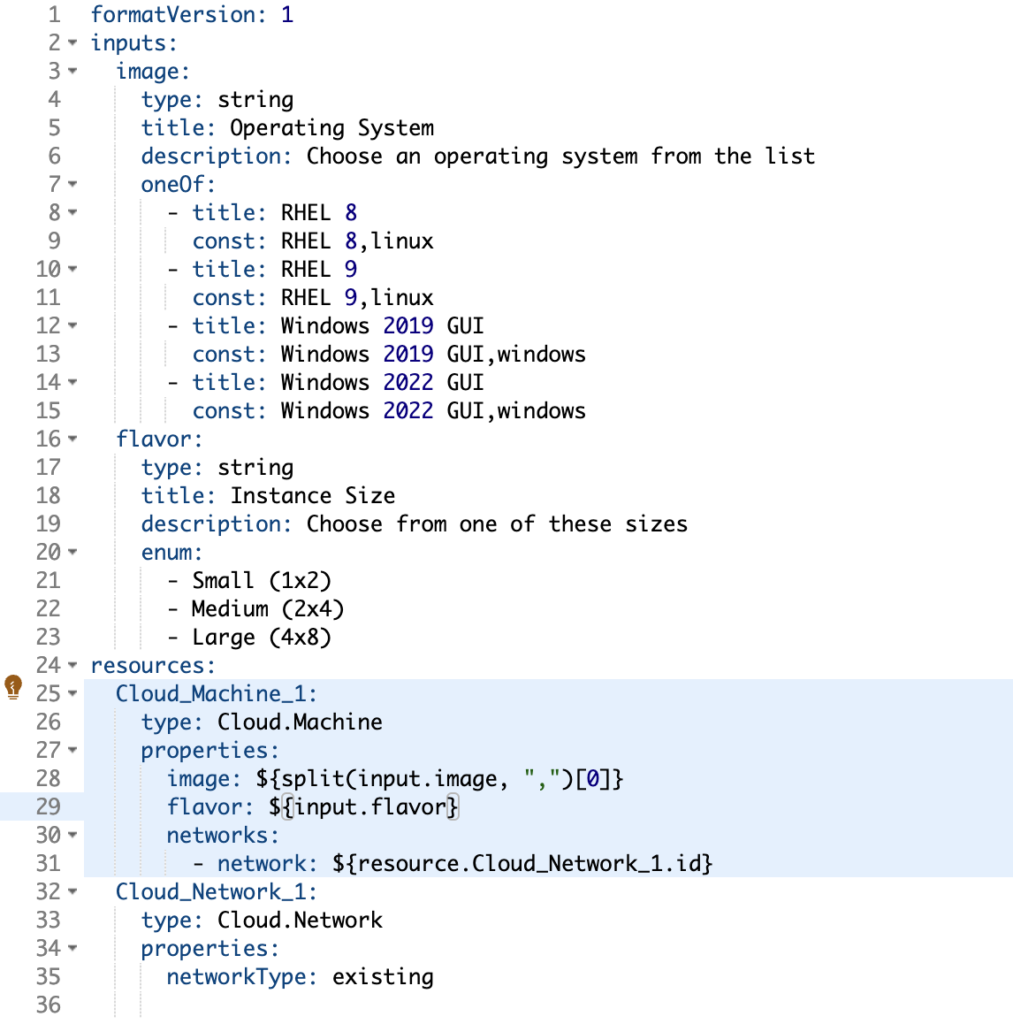
To utilize the image input properly, we need to split it up into parts. As you can see from the above image, we are able to use the split expression to do this. Here is how this works.
- ${split(<property>, “<delimeter>”)[arrayPosition]}
When we split a string, it builds an array of strings with the first position being 0. With the example above, position 0 is “RHEL 8” and position 1 is “linux”.
Finishing up our Cloud Template
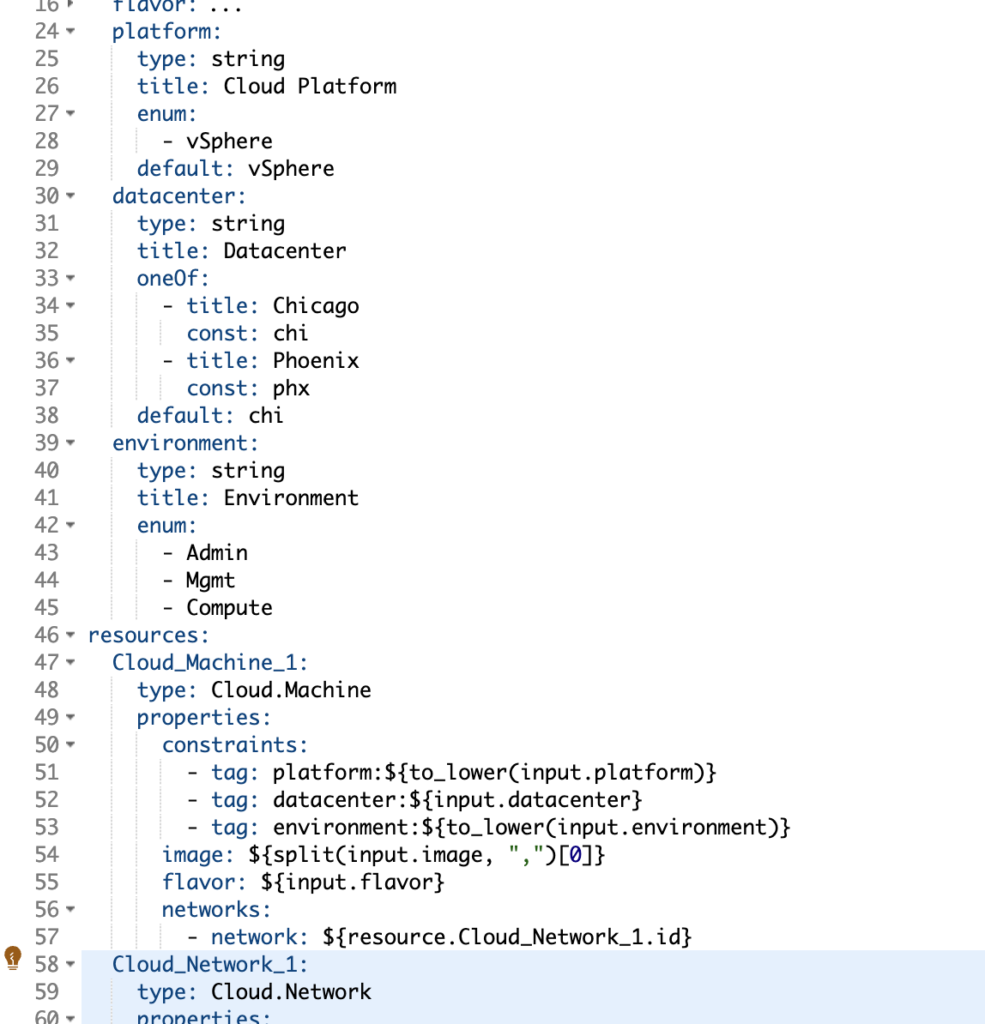
The final bits we need to do will be related to placement. We want to be able to make sure that we consume the correct infrastructure. To do this, we will add in some additional inputs and specify some constraint tags on the resources. Constraint tags must match the capability tags of the specific infrastructure like Cloud Accounts, Cloud Zones, Network Profiles, Storage Profiles and so on. Here I have added platform, datacenter and environment inputs and have referenced them in the Cloud Machine resource. Now, when the machine deploys it will look through all the infrastructure options and match everything up and make sure that I deploy where I want it to go.
Publishing a Cloud Template to the Catalog
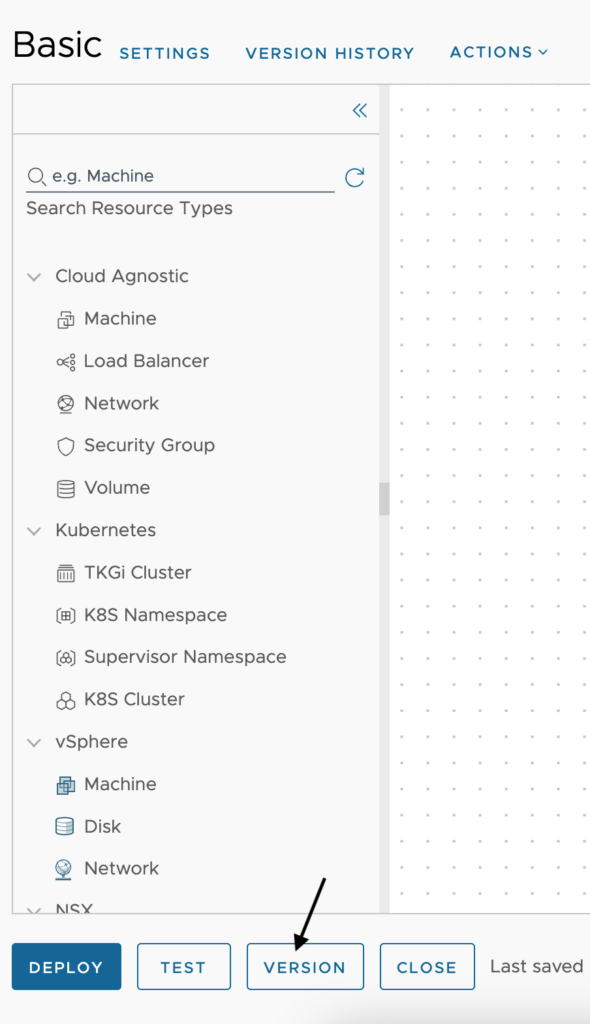
To publish a Cloud Template into the Catalog we need to version it by clicking the Version button at the bottom of the screen. Versioning sends the blueprint into Service Broker, which is the service catalog of vRealize Automation. From there you can set icons for service offerings and create customized forms which I will cover in another article.
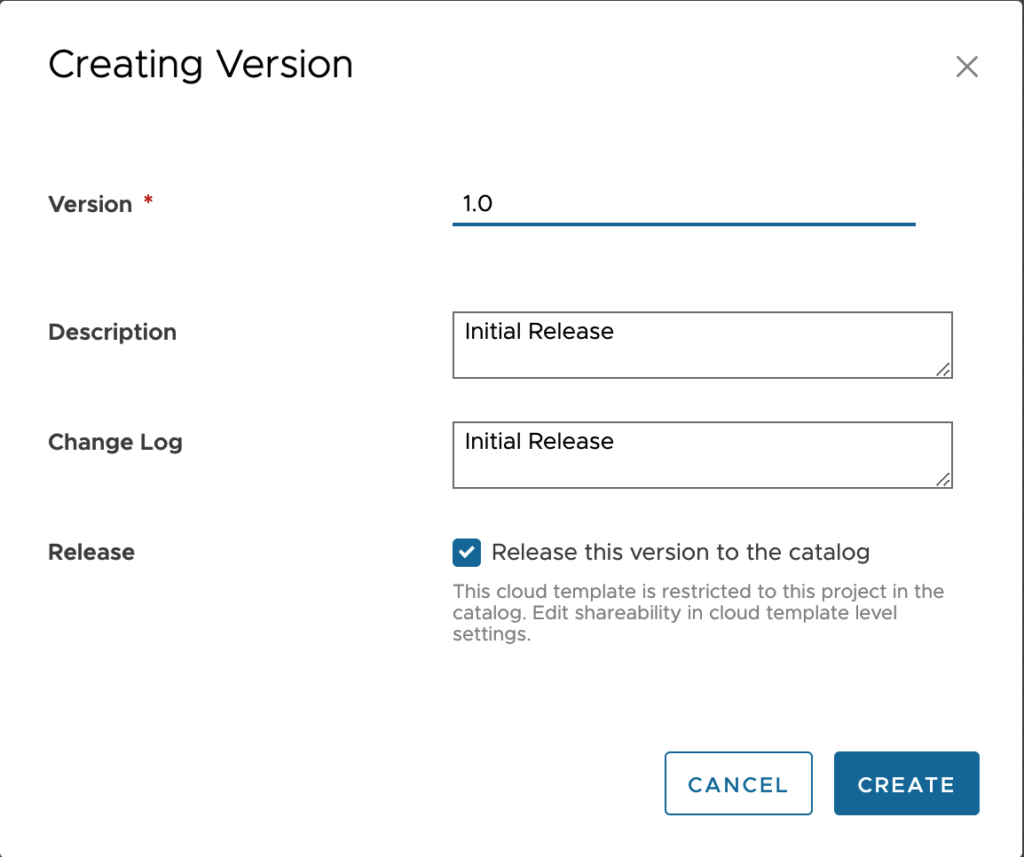
When creating a version, we need to supply just a little bit of stuff but the key piece to get it into the catalog is the Release this version to the catalog checkbox. Without this, we are only creating a version within Cloud Assembly. Once complete, click Create.
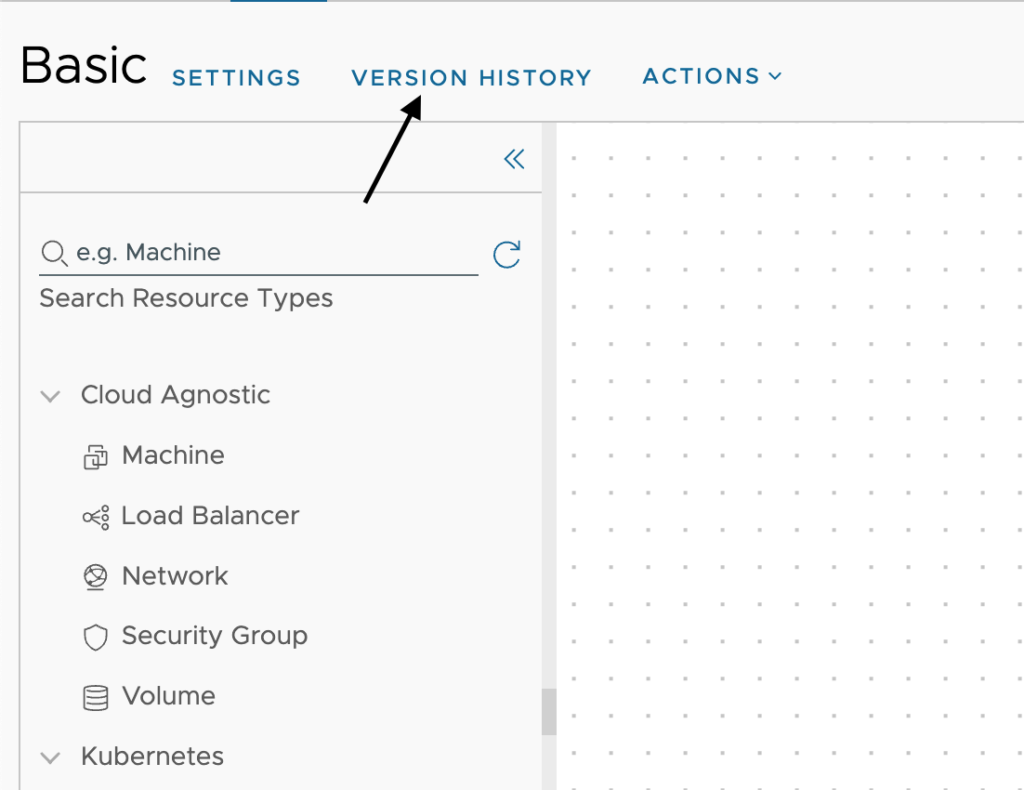
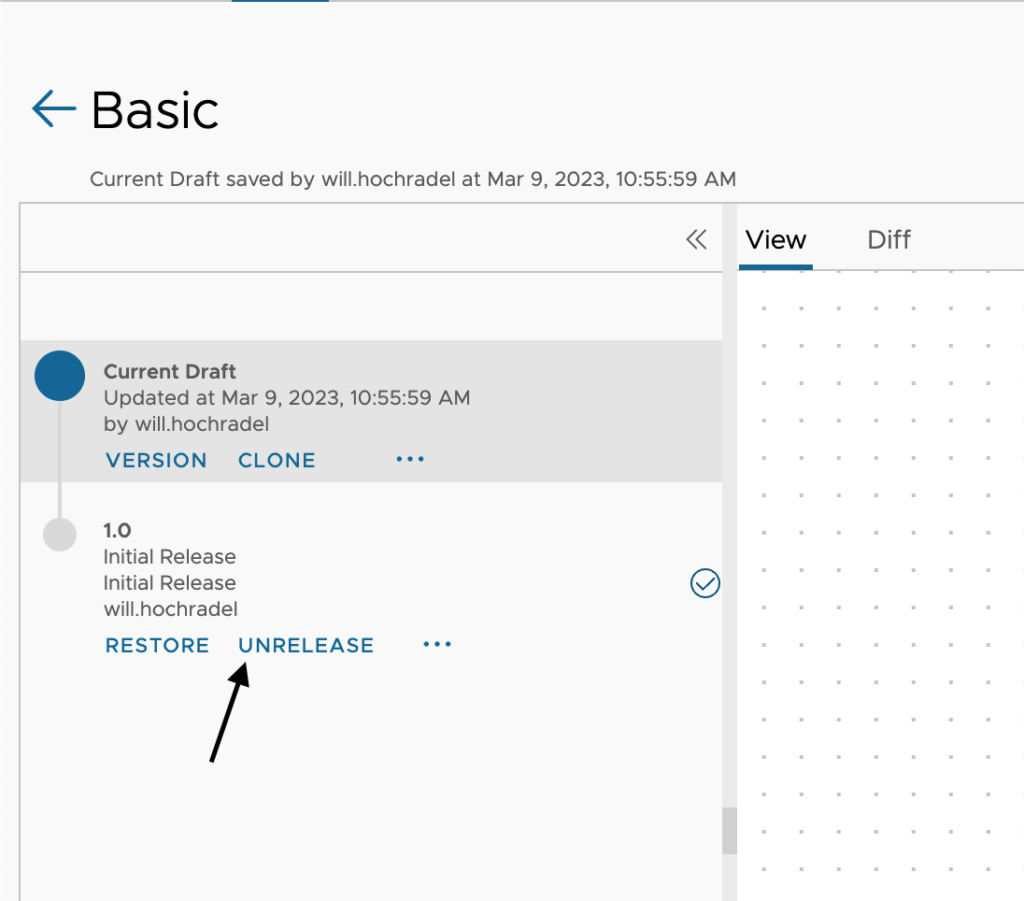
Once the version is created, we can go into our version history and look at all versions released or unreleased and even revert to a given version. Let’s look at this now. Click on Version History in at the top of the Cloud Template.
If I want to unrelease a version, I can simply click the unrelease link of the given version. You can have as many or as few versions released into the catalog at any time. To restore back to a particular version, just click the restore option and the current draft will be taken to that point.



Leave A Reply