Often times in vRealize Automation environments, I find myself needing to run elaborate powershell scripts or cmdlets that have to be installed and not being able to do this from vRealize Orchestrator directly. Typically, I would configure a PowerShell Host in Orchestrator. This requires proper WinRM and in some cases certificates for HTTPS connections to WinRM. This can be painful to deal with, so I decided to look into OpenSSH Server to replace it. Much to my surprise, I find it faster to connect and execute commands than the PowerShell host.
OpenSSH is a newer way to remote access a Windows server. Starting with Windows server 2019, OpenSSH is an out of the box optional feature that can be installed. This has become my preferred method to connect to a remote server to execute PowerShell commands, especially from vRealize Orchestrator. I will cover setting this up on Windows Server GUI and Core as well as some basics for firewall settings, but I won’t be covering anything beyond validating connection from my laptop in this article as I will be writing up additional articles discussing how to use this PowerShell host. These directions work in Windows Server 2019 and 2022, although Windows 2022 screens will look slightly different.
Windows GUI Method
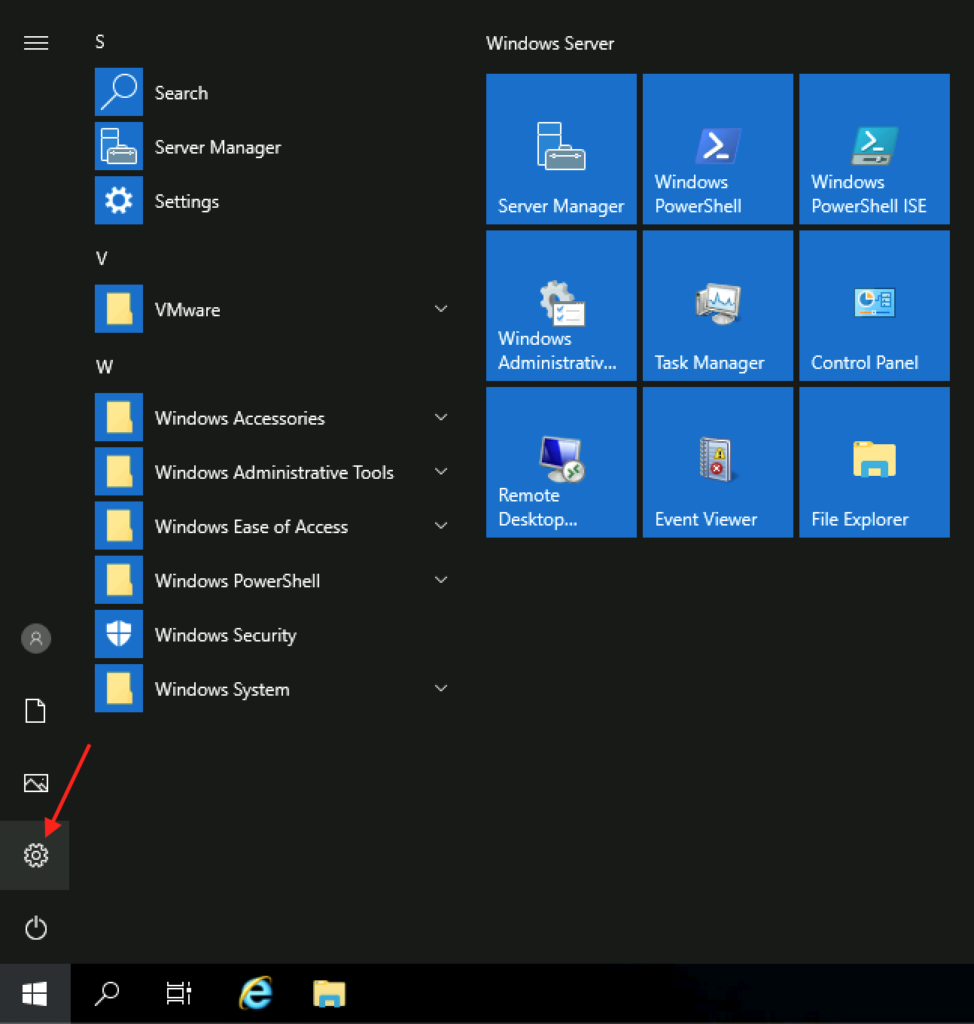
First let’s get logged in to the Windows PowerShell host with an administrative account. Once in, click on the Start menu then Settings.
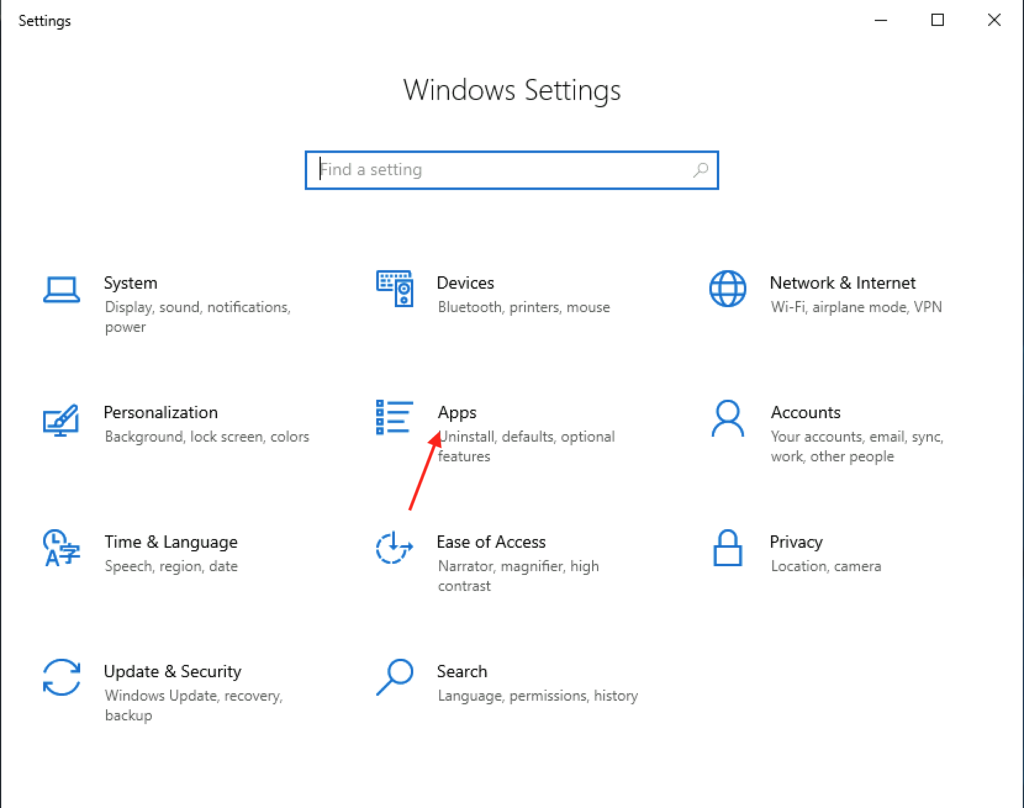
Click on Apps in the Windows Settings menu.
Next, click on ‘Manage optional features’ in the middle of the window.

You will see a list of installed optional features, of which the OpenSSH Client is already done.

To install OpenSSH Server, click on Add a feature at the top of the window.

Scroll down to OpenSSH Server in the list, click on it and then click the Install button.
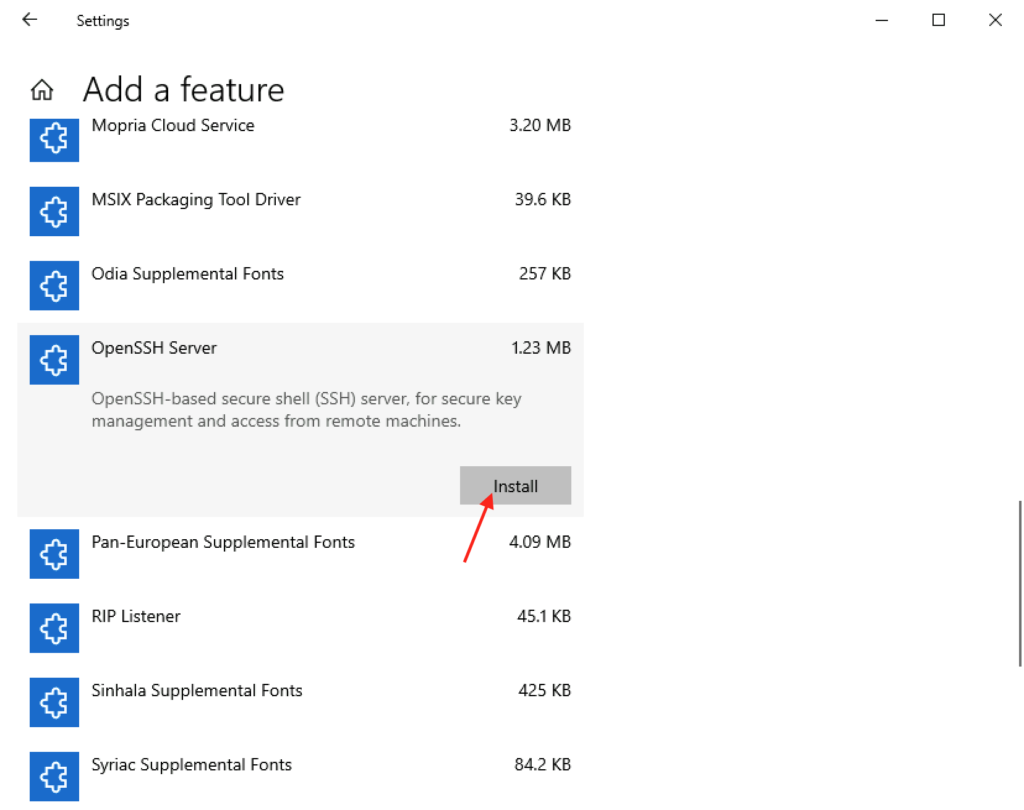
Once you click Install, it disappears from the window. To view the progress, click the back arrow at the very top left as shown below.

You should see the install running at the top of the list.

Once the install is complete, it will be repositioned alphabetically in the list with the OpenSSH Client as seen here.

Now that it is installed, we need to start the service. By default, the service it set to manual startup and stopped. Since I want to be able to connect to this box and run PowerShell at any time, I will be setting the service to Automatic startup and starting the service.


Now that OpenSSH Server is started we can connect to the server, but we will be in standard command prompt. Rather than specify to switch to a PowerShell prompt each time, let’s set the default shell to PowerShell. To do so, open the Registry Editor.

Expand Computer\HKEY_LOCAL_MACHINE\SOFTWARE\OpenSSH and create a new string value. Name the string value ‘DefaultShell’ and provide the path to powershell, ‘C:\Windows\System32\WindowsPowerShell\v1.0\powershell.exe’

The installation of OpenSSH Server sets up the needed firewall rules if the firewall is enabled, so there is no need to do anything with the firewall. At this point we are now ready to connect to the PowerShell host over SSH and open a PowerShell prompt by default.

Windows Core (PowerShell) Method
First let’s get logged in to the Windows PowerShell host with an administrative account. Once in, switch over to a PowerShell prompt by typing in ‘powershell’.
List the optional features using the following command:
- Get-WindowsCapability -Online | ? Name -like ‘OpenSSH*’
We can see that the OpenSSH Client is installed already but that OpenSSH Server is not.

To Install the OpenSSH Server, type in the following command:
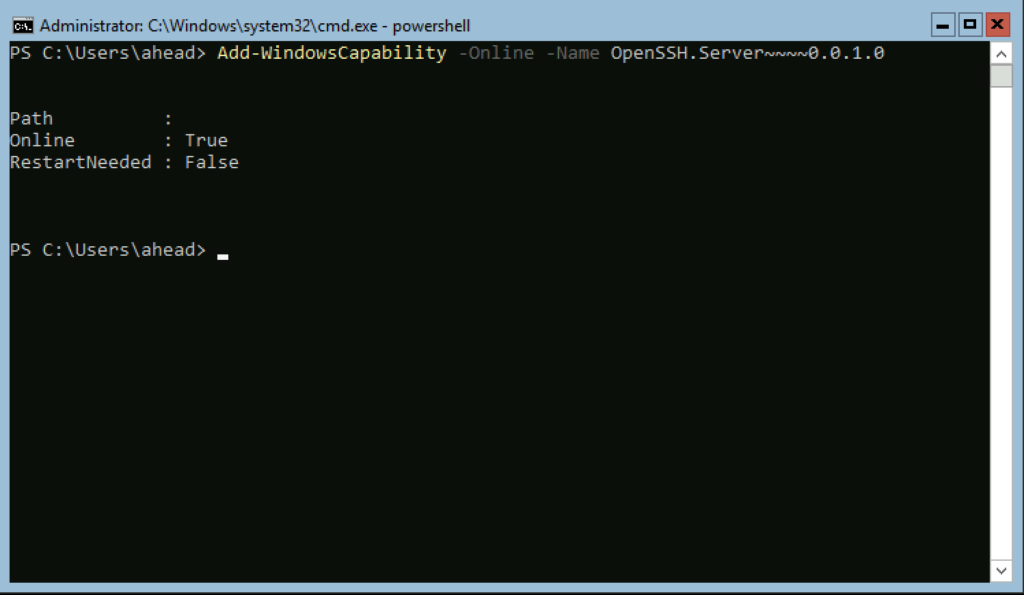
- Add-WindowsCapability -Online -Name OpenSSH.Server~~~~0.0.1.0
Once the install is complete, you will see that it is installed with the ‘Online’ field now being ‘True’
Now that it is installed, we need to start the service. By default, the service it set to manual startup and stopped. Since I want to be able to connect to this box and run PowerShell at any time, I will be setting the service to Automatic startup and starting the service.
To do this, type in the following commands:
- Start-Service -Name ‘sshd’
- Set-Service -Name ‘sshd’ -StartupType ‘Automatic’
Show the details of the service to validate the settings:
- Get-Service -Name ‘sshd’ | Select *
You should see the Status as ‘Running’ and StartType as ‘Automatic’

Now that OpenSSH Server is started we can connect to the server, but we will be in a standard command prompt. Rather than specify to switch to a PowerShell prompt each time, let’s set the default shell to PowerShell. To do so, run the following command:
- New-ItemProperty -Path “HKLM:\SOFTWARE\OpenSSH” -Name DefaultShell -Value “C:\Windows\System32\WindowsPowerShell\v1.0\powershell.exe” -PropertyType String -Force
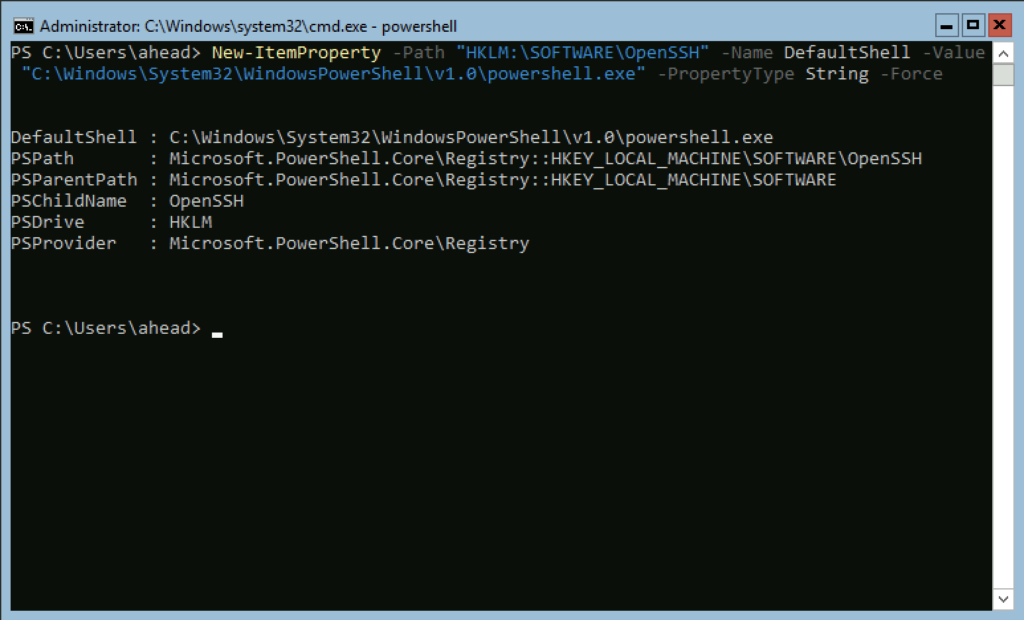
The installation of OpenSSH Server sets up the needed firewall rule if the firewall is enabled, so there is no need to do anything with the firewall. Below is a command to setup the rule as set by default if for some reason you need to fix it.
- New-NetFirewallRule -Name “SSH” -DisplayName “SSH” -Description “Allow SSH” -Profile Any -Direction Inbound -Action Allow -Protocol TCP -Program Any -LocalAddress Any -RemoteAddress Any -LocalPort 22 -RemotePort Any

At this point we are now ready to connect to the PowerShell host over SSH and open a PowerShell prompt by default.

Troubleshooting
Issue: Add-WindowsCapability failed. Error code = 0x800f0954
If you are using internal Update Servers (WSUS), you may run into error code 0x800f0954 when attempting to add the OpenSSH.Server capability.
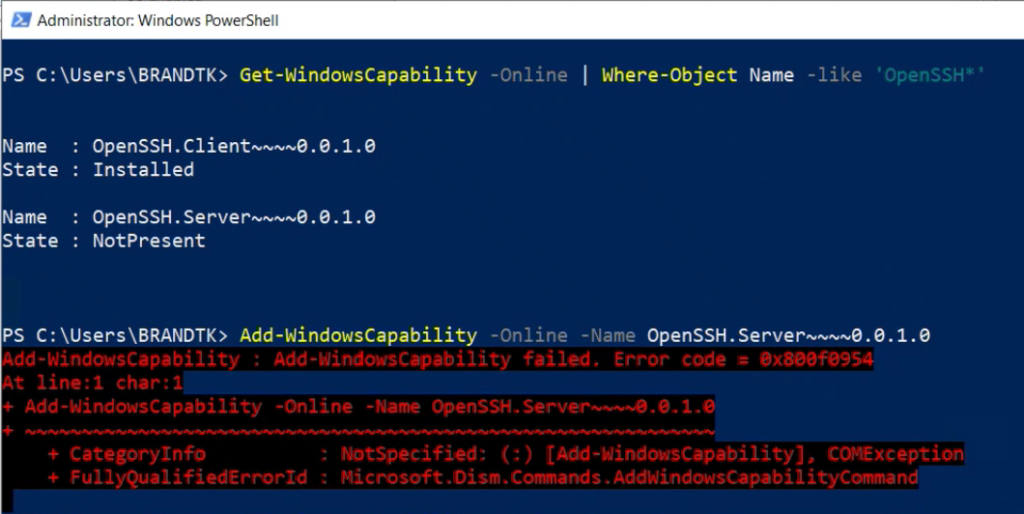
This is because we are looking to your Update Servers for the bits to install this feature. To work around this issue, we need to launch into our Local Group Policy Editor and expand Computer Configuration > Administrative Templates >System and open the policy, “Specify settings for optional component installation and component repair”.
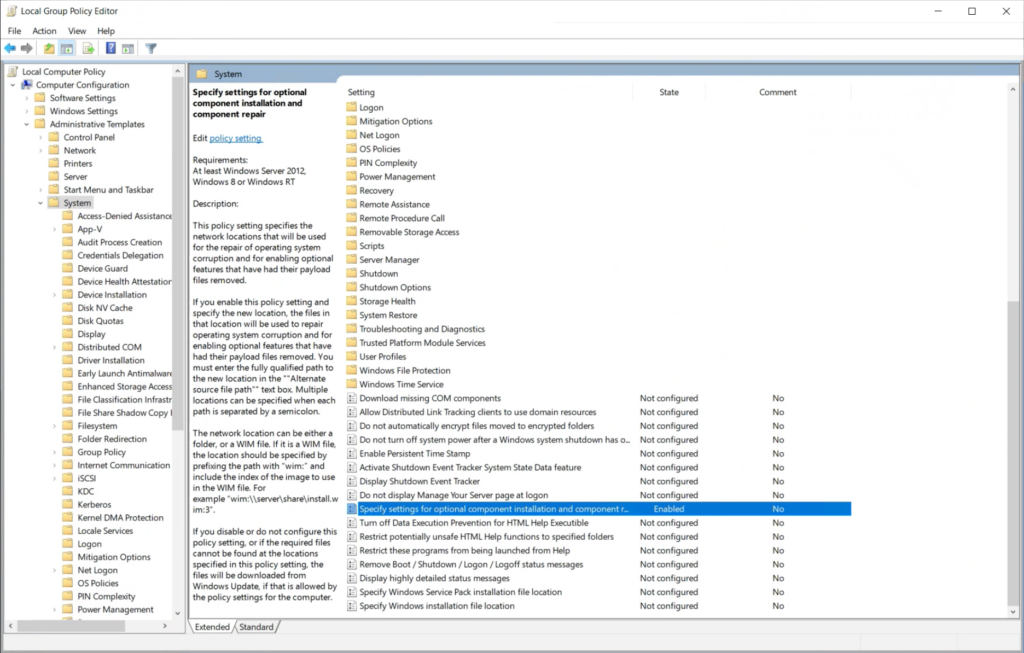
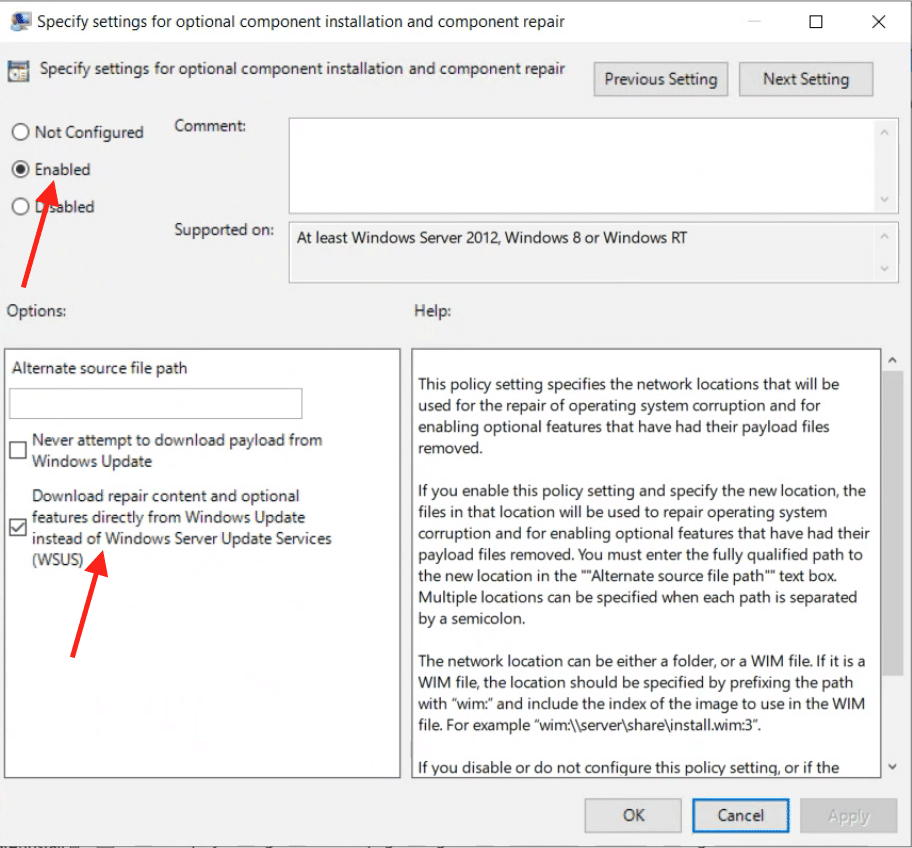
By enabling this and checking the box, “Download repair content and optional features directly from Windows Update instead of Windows Server Update Services (WSUS), you will be able to call out to Microsoft to grab the needed bits and get the installation completed.


Leave A Reply